
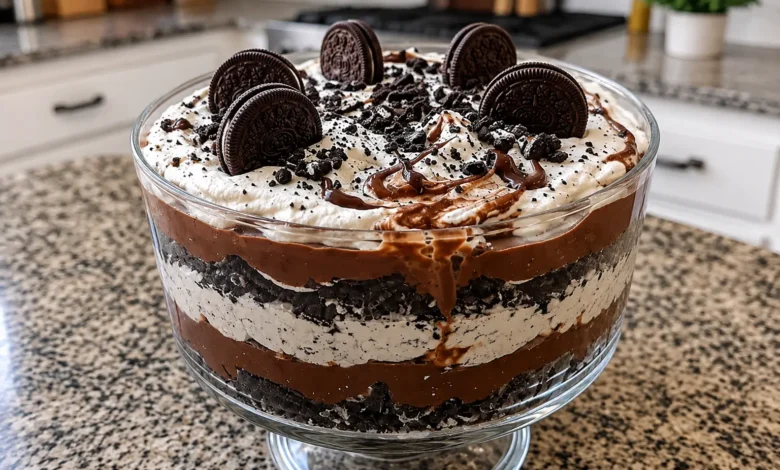
Some desserts look like you spent half the day in the kitchen, even when you didn’t. No-Bake Chocolate Trifle is one of those recipes. You get dramatic layers of chocolate cake or brownies, silky chocolate pudding, fluffy whipped topping, cookies, and plenty of chocolate in every spoonful, yet the actual assembly couldn’t be much simpler.
This is the dessert you can turn to when you’re expecting family, bringing something to a potluck, or simply craving chocolate without wanting a complicated baking project. You don’t need perfect decorating skills, either. The layers do most of the visual work for you.
Better still, you can prepare your chocolate trifle ahead of time and let it chill while you handle everything else. Once it reaches the table in a clear glass bowl, those chocolate-and-cream layers make it feel special enough for birthdays, holidays, Sunday dinners, or any occasion when dessert deserves a little extra attention.
What Is a No-Bake Chocolate Trifle?
A trifle is a layered dessert traditionally built around cake, custard or another creamy component, and whipped cream. Modern versions vary considerably, which makes the dessert especially easy to adapt to different flavors.
With a No-Bake Chocolate Trifle, you take that layered idea in a decidedly chocolate direction. Instead of relying on fruit or traditional custard, you can combine prepared chocolate cake or brownies with chocolate pudding, whipped topping, cookies, chocolate chips, and chocolate sauce.
Traditional Trifle vs. Chocolate Trifle
Traditional English-style trifles often contain sponge cake, custard, fruit, and whipped cream. Chocolate versions take advantage of the same layered presentation but swap in richer chocolate ingredients.
Your layers might include:
- Chocolate cake or fudgy brownies
- Thick chocolate pudding
- Whipped topping or freshly whipped cream
- Crushed chocolate sandwich cookies
- Chocolate chips or curls
- Chocolate syrup
The contrast is what makes this dessert work so well. You have soft cake, creamy pudding, airy whipped topping, and little bits of chocolate or cookies adding texture.
Why This No-Bake Version Is So Easy
The biggest shortcut is that you can use already-prepared cake or brownies. There’s no need to turn on the oven while making the trifle itself.
Instant pudding provides another convenient shortcut. Once the pudding thickens, you’re essentially ready to start layering.
That makes this an approachable dessert even if baking isn’t your favorite thing to do.
Why You’ll Love This No-Bake Chocolate Trifle
There’s a lot to appreciate about an easy chocolate trifle, especially when you need a dessert for several people.
You can make much of it ahead, customize the layers, and scale the recipe to match your serving bowl. It also doesn’t require piping elaborate decorations or getting a cake perfectly level.
You’ll especially appreciate that this dessert is:
- Rich and intensely chocolatey
- Creamy without feeling like one uniform texture
- Easy enough for beginner cooks
- Convenient for preparing ahead
- Suitable for feeding a crowd
- Simple to customize
- Attractive without complicated decorating
Perfect for Parties and Holidays
A large glass bowl filled with chocolate layers naturally looks festive.
You can serve your trifle at Christmas, Thanksgiving, Easter, Valentine’s Day, birthdays, graduation parties, summer cookouts, potlucks, or casual family dinners.
For a larger gathering, place it in the center of your dessert table and let guests scoop their own portions. For something more polished, make individual trifles in clear dessert glasses.
No-Bake Chocolate Trifle Ingredients
You don’t need unusual ingredients to build a memorable trifle. Most of what you need is available in an ordinary grocery store.
| Ingredient | Amount | Purpose |
|---|---|---|
| Prepared chocolate cake or brownies | 1 large batch | Creates the soft chocolate layers |
| Instant chocolate pudding mix | 2 packages | Adds a rich, creamy layer |
| Cold milk | Amount called for on pudding package | Prepares the pudding |
| Whipped topping | 16 oz | Creates fluffy cream layers |
| Chocolate sandwich cookies | 15–20 | Adds crunch and chocolate flavor |
| Chocolate chips | 1 cup | Adds extra texture |
| Chocolate syrup | ½ cup | Intensifies the chocolate flavor |
| Chocolate curls or shavings | As needed | Finishes the dessert |
Exact quantities can be adjusted depending on the size of your trifle bowl.
Choosing the Best Chocolate Cake or Brownies
You have several options for the cake layer.
Prepared chocolate cake gives you a softer, lighter trifle. Brownies make the dessert denser and more intensely chocolatey. Chocolate pound cake works particularly well when you want pieces that hold their shape.
Store-bought cake is completely fine here. In fact, it’s one of the easiest ways to turn this into a genuinely low-effort dessert.
Cut your cake or brownies into bite-size cubes rather than crumbling them. Larger pieces create more defined layers and retain a pleasant texture after chilling.
Choosing Your Chocolate Pudding
Instant chocolate pudding keeps preparation quick. Dark chocolate pudding gives you a deeper cocoa flavor, while milk chocolate pudding creates a sweeter, milder result.
Can You Use Homemade Chocolate Pudding?
Absolutely. If you have a favorite homemade chocolate pudding, you can use it instead.
Just make sure the pudding has completely cooled and thickened before adding it. Warm or thin pudding can melt the whipped layer and cause your carefully assembled trifle to become runny.
How to Make No-Bake Chocolate Trifle Step by Step
Once your ingredients are ready, assembling your trifle is mostly a matter of layering.
Step 1: Prepare the Chocolate Pudding
Prepare your instant pudding with cold milk according to the package directions.
Whisk until smooth, then allow it to stand until thickened. Refrigerate it while you prepare the remaining ingredients.
Step 2: Prepare the Chocolate Cake
Cut your prepared chocolate cake or brownies into approximately 1-inch cubes.
Don’t worry about making every cube identical. A slightly rustic appearance works beautifully in a trifle.
Step 3: Prepare the Cookies and Chocolate
Roughly crush your chocolate sandwich cookies. You want a combination of smaller crumbs and larger pieces rather than turning everything into powder.
Set aside your chocolate chips, syrup, and garnishes.
Step 4: Assemble the Chocolate Trifle
Place a layer of chocolate cake or brownie cubes across the bottom of your clear serving bowl.
Spoon chocolate pudding over the cake. Follow with a layer of whipped topping.
Sprinkle crushed chocolate cookies and chocolate chips over the cream. Add a light drizzle of chocolate syrup.
Repeat the layers until you’ve reached the top of your bowl.
Step 5: Decorate the Top
Finish with a generous whipped topping layer.
Then add chocolate curls, cookie crumbs, mini chocolate chips, or another light drizzle of chocolate syrup.
Try not to overload the top. A few contrasting textures can make the finished dessert look more inviting than covering every inch.
Step 6: Chill
Cover your trifle and refrigerate it before serving.
Chilling gives the flavors time to mingle while allowing the cake to soften slightly against the pudding without completely losing its texture.
How to Create Beautiful Chocolate Trifle Layers
Taste comes first, but part of the fun of a trifle is seeing every layer through the bowl.
Use a Clear Trifle Bowl
A traditional clear glass trifle bowl works especially well because the straight sides display the layers.
Don’t have one? A large clear glass serving bowl works too.
Keep Your Layers Even
Spread each layer all the way to the edge of the bowl so it remains visible from the outside.
Use the back of a spoon to gently smooth the pudding and whipped topping without pushing too firmly into the cake.
Easy Trick for Cleaner Layers
If you’re making your dessert for a party or taking photographs, transfer the pudding and whipped topping into separate piping bags.
You don’t need decorative tips. Simply snip the ends and pipe the mixture around the inside edge before filling the center. This gives you considerably more control.
Tips for the Best No-Bake Chocolate Trifle
A trifle is forgiving, but a few small details make a noticeable difference.
Make sure your pudding is properly thickened before assembling. Keep your ingredients cold, and don’t cut the cake into tiny crumbs.
If you’re using cookies for crunch, save some for the top and add them closer to serving time.
How to Prevent a Soggy Chocolate Trifle
Your cake should soften slightly—that’s part of what makes a trifle so good. But you don’t want it swimming in liquid.
Use thick pudding rather than runny pudding, and be conservative with chocolate syrup between the layers. Brownies and pound cake generally retain more structure than very delicate cake.
If you love crunchy cookies, add most of them near serving time.
Delicious No-Bake Chocolate Trifle Variations
Once you’ve mastered the basic recipe, you can easily create different versions.
Oreo Chocolate Trifle
Layer crushed Oreo-style chocolate sandwich cookies between your pudding and whipped topping. Finish the top with additional cookie pieces.
Chocolate Brownie Trifle
Replace chocolate cake completely with fudgy brownies.
This version is particularly rich, so cutting the brownies into smaller cubes can help balance each serving.
Chocolate Peanut Butter Trifle
Chocolate and peanut butter are an easy pairing.
Add a peanut butter cream layer or scatter chopped peanut butter cups between your chocolate layers. A thin peanut butter drizzle on top makes the flavor immediately recognizable.
Chocolate Strawberry Trifle
Fresh strawberries brighten an otherwise very rich dessert.
Slice them and add a layer between your pudding and whipped topping. Save several attractive berries for decorating the top.
Chocolate Caramel Trifle
Replace some of the chocolate syrup with caramel sauce. You can also scatter chopped chocolate-caramel candy throughout the layers.
A small amount of flaky salt on top provides a pleasant contrast to the sweetness.
Individual Chocolate Trifles
Instead of one large dessert, build your layers inside mason jars, dessert glasses, or small clear cups.
Individual portions are particularly useful for parties because guests can simply grab a dessert rather than waiting for the large trifle to be served.
How to Make No-Bake Chocolate Trifle Ahead of Time
This dessert is well suited to advance preparation.
You can prepare the pudding, cube the cake, crush your cookies, and organize your garnishes before assembly.
You can also assemble the main layers several hours before serving and keep the dessert covered in your refrigerator.
When Should You Add the Final Garnishes?
If you’re using soft toppings such as chocolate curls or chocolate chips, you can decorate your trifle in advance.
For crunchy cookie pieces, however, consider saving some until shortly before serving. They’ll maintain more of their texture.
How to Store No-Bake Chocolate Trifle
Because your trifle contains perishable ingredients such as milk-based pudding and whipped topping, keep it covered and refrigerated.
For general food safety, USDA guidance says perishable foods shouldn’t remain at room temperature for more than two hours, or one hour when temperatures are above 90°F. USDA also advises keeping refrigerated foods at 40°F or below. (Food Safety and Inspection Service)
For best dessert quality, however, you’ll probably want to enjoy your trifle sooner rather than later. The longer it sits, the softer the cake and cookies become.
Can You Freeze Chocolate Trifle?
Freezing an assembled trifle isn’t usually the best choice for texture.
Pudding and whipped layers can change consistency after freezing and thawing, while the cake can become overly soft.
If possible, prepare only what you expect to serve and refrigerate leftovers promptly.
What to Serve With Chocolate Trifle
This dessert is rich enough to stand alone, but simple pairings can complement it.
Try serving it with fresh strawberries, raspberries, hot coffee, espresso, or cold milk.
Fresh berries are particularly helpful because their slight tartness balances the sweet chocolate layers.
Common No-Bake Chocolate Trifle Mistakes to Avoid
Using Warm Ingredients
Allow homemade pudding, cake, or brownies to cool completely. Warm ingredients can soften or melt your cream layers.
Making the Pudding Too Thin
Your pudding needs enough structure to create a visible layer. Let it thicken before assembly.
Adding Too Much Chocolate Sauce
More chocolate isn’t automatically better. Too much syrup can make your cake overly wet and overwhelm the creamy elements.
Crushing the Cake Too Finely
You want recognizable pieces of cake or brownies. Tiny crumbs disappear into the pudding quickly.
Serving Immediately
Giving your trifle some time in the refrigerator helps the layers settle and the flavors come together.
FAQ About No-Bake Chocolate Trifle
Can I Make No-Bake Chocolate Trifle the Night Before?
Yes. You can assemble it the night before and keep it covered in the refrigerator. If you’re using crunchy cookies as decoration, consider adding the final cookie pieces before serving.
What Can I Use Instead of a Trifle Bowl?
Use any large clear glass bowl with enough depth for several layers. You can also make individual portions in glasses, jars, or dessert cups.
Can I Use Brownies in No-Bake Chocolate Trifle?
Yes. Brownies make an especially rich chocolate trifle and usually maintain a firmer texture than soft cake.
Can You Make No-Bake Chocolate Trifle With Store-Bought Cake?
Definitely. Store-bought chocolate cake is one of the easiest shortcuts for this recipe.
How Long Should No-Bake Chocolate Trifle Chill?
A few hours of chilling works well because it allows the layers to settle while keeping some texture. If you’re preparing it overnight, reserve crunchy garnishes until serving.
How Do You Keep a Chocolate Trifle From Getting Soggy?
Use thick pudding, sturdy pieces of cake or brownie, and a moderate amount of chocolate sauce. Add crunchy toppings closer to serving.
What Other Toppings Can You Add?
Try chocolate shavings, mini chocolate chips, crushed cookies, brownie crumbs, strawberries, raspberries, caramel sauce, chopped nuts, or candy pieces.
Can I Make Individual No-Bake Chocolate Trifles?
Yes. Simply repeat the same layers inside clear glasses or dessert cups. It’s an easy way to create attractive individual desserts for a party.
Conclusion
A No-Bake Chocolate Trifle proves you don’t need complicated techniques to put an impressive dessert on the table. Layers of chocolate cake or brownies, silky pudding, fluffy whipped topping, crunchy cookies, and chocolate garnishes create plenty of flavor and texture without requiring elaborate decorating.
Better yet, you can make the recipe your own. Use brownies when you’re craving something extra fudgy, add strawberries for freshness, layer in peanut butter for richness, or bring in caramel for a sweet-salty twist.
Whether you’re preparing dessert for a holiday dinner, birthday, potluck, or quiet weekend at home, this easy chocolate trifle gives you a crowd-friendly option that looks every bit as tempting as it tastes.
If you make this No-Bake Chocolate Trifle, leave a comment and share which version you tried. Save the recipe for your next gathering, and don’t forget to rate it so other chocolate lovers can find it too!
No-Bake Chocolate Trifle




 Want an easier way to get my recipes? ❤️