
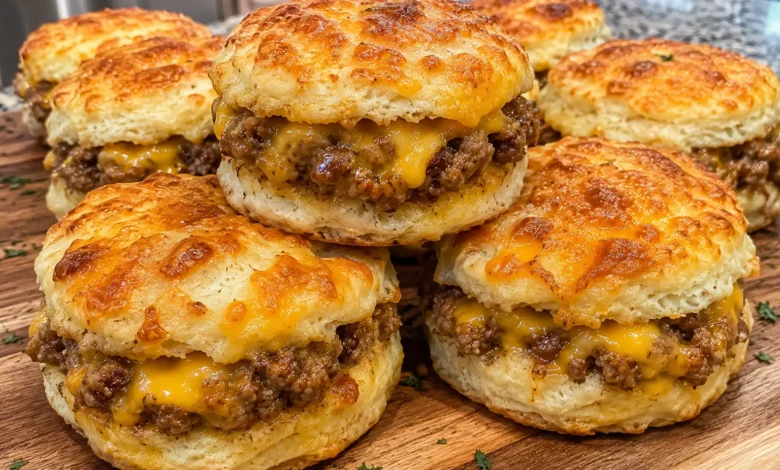
If you love warm, buttery biscuits, juicy seasoned beef, and gooey melted cheese, these Cheesy Biscuit Sliders are about to become one of your favorite comfort foods. Each golden biscuit is stuffed with a delicious beef and cheese filling, then brushed with garlic butter and baked until perfectly golden.
You know those evenings when you want something homemade but don’t feel like spending hours in the kitchen? That’s exactly when this recipe comes in handy. With refrigerated biscuit dough, a handful of everyday ingredients, and about 35 minutes, you can have a tray of cheesy, savory sliders ready for the table.
These easy Cheesy Biscuit Sliders are perfect for busy weeknight dinners, football parties, holiday gatherings, or an afternoon snack. They’re filling, easy to customize, and delicious served with your favorite dipping sauce.
The best part? You don’t need special cooking skills or complicated ingredients. Just prepare the filling, stuff your biscuits, brush them with butter, and let your oven do the rest.
What Are Cheesy Biscuit Sliders?
Cheesy Biscuit Sliders are small, handheld sandwiches made with soft biscuit dough instead of traditional hamburger buns. In this version, each biscuit is filled with seasoned ground beef, cheddar cheese, and mozzarella before being baked to golden perfection.
Unlike regular sliders, which are usually assembled with already-baked buns, these cheese-stuffed biscuit sliders bake with the filling tucked inside the dough. That creates a fluffy exterior with a warm, savory center.
They’re similar to cheeseburger biscuit bombs, but you can serve them as appetizers, snacks, or a complete meal.
Why You’ll Love This Cheesy Biscuit Sliders Recipe
There are plenty of reasons to add this recipe to your regular dinner rotation:
- Quick and easy: You can prepare everything in approximately 35 minutes.
- Simple ingredients: Most ingredients are affordable and easy to find.
- Extra cheesy: Cheddar and mozzarella create a rich, melty filling.
- Family-friendly: The familiar cheeseburger flavors appeal to adults and children.
- Perfect for parties: Individual portions make serving easy.
- Customizable: You can switch the meat, cheese, or seasonings to suit your taste.
You can even prepare the beef filling ahead of time, making assembly much faster when you’re ready to cook.
Ingredients for Cheesy Biscuit Sliders
You only need a few basic ingredients to make these buttery, cheese-filled biscuit sliders. Refrigerated biscuit dough saves time, while seasoned ground beef and two types of cheese create a satisfying filling.
Complete Ingredients Table
Prep Time: 15 minutes | Cook Time: 15–20 minutes | Total Time: 30–35 minutes | Servings: 8 sliders
| Ingredient | Amount |
|---|---|
| Refrigerated biscuit dough | 1 can (8 biscuits) |
| Ground beef | 1 lb |
| Shredded cheddar cheese | 1 cup |
| Shredded mozzarella cheese | ½ cup |
| Small onion, finely diced | ½ cup |
| Garlic cloves, minced | 2 |
| Worcestershire sauce | 1 tablespoon |
| Salt | ½ teaspoon |
| Black pepper | ¼ teaspoon |
| Unsalted butter, melted | 3 tablespoons |
| Garlic powder | ½ teaspoon |
| Dried parsley | 1 teaspoon |
Choosing the Best Biscuit Dough
Refrigerated homestyle biscuits are a convenient option because they’re soft, easy to flatten, and sturdy enough to hold the filling.
Flaky-layer biscuits can also work, although you may need to pinch the seams more carefully to prevent the layers from separating during baking.
If you prefer homemade biscuit dough, you can use it instead. Just make sure the dough is soft enough to stretch around the filling without tearing.
Best Cheese for Cheesy Biscuit Sliders
Cheddar and mozzarella make an excellent combination.
Cheddar provides a sharp, savory flavor that pairs beautifully with ground beef. Mozzarella adds creaminess and that stretchy, melted cheese texture everyone loves.
You can also experiment with:
- Monterey Jack for a mild, creamy filling.
- Pepper Jack for a little heat.
- Provolone for a Philly cheesesteak-inspired flavor.
- Smoked Gouda for a deeper, smoky taste.
Can You Use Pre-Shredded Cheese?
Yes! Pre-shredded cheese is convenient and works well in this recipe.
However, freshly shredded cheese often melts more smoothly because it doesn’t contain the same anti-caking ingredients found in many packaged shredded cheeses.
For the creamiest filling, grate your cheese just before assembling the sliders.
How to Make Cheesy Biscuit Sliders Step by Step
Making homemade Cheesy Biscuit Sliders is easier than you might expect. The most important steps are cooking the filling thoroughly, avoiding excess moisture, and sealing the dough properly.
Step 1: Preheat Your Oven
Preheat your oven to 375°F (190°C).
Line a large baking sheet with parchment paper to prevent sticking and make cleanup easier.
Leave enough room between the sliders so the biscuits can expand as they bake.
Step 2: Cook the Ground Beef Filling
Place a large skillet over medium heat.
Add the ground beef and diced onion. Cook for approximately 6–8 minutes, breaking the beef into small pieces with a wooden spoon.
Continue cooking until the beef is fully browned and reaches an internal temperature of 160°F (71°C).
Add the minced garlic and cook for another 30 seconds until fragrant.
Stir in the Worcestershire sauce, salt, and black pepper.
Drain any excess grease, then remove the skillet from the heat.
Allow the filling to cool slightly before assembling your sliders. This helps prevent the biscuit dough from becoming overly soft.
Step 3: Prepare the Biscuit Dough
Open the refrigerated biscuit dough and separate the eight biscuits.
Place each biscuit on a clean work surface and gently flatten it into a circle approximately 4–5 inches wide.
Try to keep the center slightly thicker than the edges. This gives the filling extra support and reduces the chance of tearing.
Avoid stretching the dough too thin.
Step 4: Add the Beef and Cheese Filling
Place a portion of the cooked ground beef in the center of each flattened biscuit.
Top with shredded cheddar and mozzarella.
Divide the filling evenly among the eight biscuits, taking care not to overstuff them.
Carefully bring the edges of the dough together over the filling and pinch firmly to seal.
Turn each filled biscuit over so the seam faces downward.
Step 5: Prepare the Garlic Butter Topping
In a small bowl, combine:
- 3 tablespoons melted butter
- ½ teaspoon garlic powder
- 1 teaspoon dried parsley
Stir until everything is well mixed.
Brush the garlic butter generously over the tops of the stuffed biscuits.
Save a little butter to brush over them after baking.
Step 6: Bake Until Golden Brown
Arrange the sliders on your prepared baking sheet, leaving approximately 2 inches between them.
Bake for 15–20 minutes, or until the biscuits are golden brown and fully cooked in the center.
Because the biscuits are stuffed, they may require slightly more time than plain biscuits.
Remove the baking sheet from the oven and brush the warm sliders with the remaining garlic butter.
Allow them to rest for 3–5 minutes before serving.
How Do You Know When Biscuit Sliders Are Done?
Your Cheesy Biscuit Sliders should have golden-brown tops, fully baked dough, and hot, melted cheese inside.
If the tops brown too quickly but the centers still look doughy, loosely cover the biscuits with aluminum foil and continue baking for a few more minutes.
Expert Tips for the Best Cheesy Biscuit Sliders
A few simple techniques can make a noticeable difference in the finished texture and flavor.
Prevent Soggy Biscuit Bottoms
One of the most common problems with stuffed biscuits is excess moisture.
To prevent sogginess:
- Drain the cooked beef thoroughly.
- Avoid adding too much Worcestershire sauce.
- Let the filling cool slightly before stuffing.
- Don’t overload the biscuits with cheese or meat.
- Bake until the bottom and center of the dough are fully cooked.
These steps help your sliders develop a soft interior without becoming wet or gummy.
Keep the Cheese Inside
If your cheese leaks out during baking, the dough probably wasn’t sealed tightly enough.
After adding the filling, bring all the edges together and pinch firmly.
You can gently roll the stuffed biscuit between your hands to smooth the surface, but avoid squeezing too hard.
Always bake seam-side down.
Make the Tops Extra Golden
For a beautiful golden finish, brush your sliders with garlic butter before baking.
You can also add a small sprinkle of Parmesan cheese for extra flavor.
Once they’re out of the oven, another light coating of butter gives the biscuits a glossy, appetizing appearance.
Delicious Cheesy Biscuit Sliders Variations
One of the best things about this recipe is how easily you can change the filling. Once you master the basic method, you can create several different versions.
Garlic Parmesan Cheesy Biscuit Sliders
Add 2 tablespoons of grated Parmesan cheese to your garlic butter mixture.
Sprinkle a little Italian seasoning over the tops before baking.
Serve with warm marinara sauce for dipping.
BBQ Beef Biscuit Sliders
Mix 2–3 tablespoons of your favorite BBQ sauce into the cooked and drained ground beef.
Use sharp cheddar or smoked Gouda for a richer flavor.
These sliders are especially delicious with coleslaw or crispy potato wedges.
Buffalo Chicken Cheesy Biscuit Sliders
Replace the ground beef with fully cooked, shredded chicken.
Toss the chicken with buffalo sauce and fill the biscuits with mozzarella or Monterey Jack.
Serve with ranch dressing or blue cheese dip.
Philly Cheesesteak Biscuit Sliders
Use thinly sliced, cooked beef instead of ground beef.
Add sautéed bell peppers and onions, then top with provolone cheese.
This variation delivers classic cheesesteak flavors inside a buttery biscuit.
Cheesy Turkey Biscuit Sliders
For another delicious option, substitute ground turkey for the beef.
Season it with garlic, onion, black pepper, and a little Worcestershire sauce.
Cook the turkey to 165°F (74°C) before assembling the biscuits.
What to Serve with Cheesy Biscuit Sliders
These cheesy beef biscuit sliders are satisfying on their own, but adding a side dish can turn them into a complete meal.
Best Side Dishes
For a casual family dinner, try serving your sliders with:
- Crispy French fries
- Sweet potato wedges
- Creamy coleslaw
- Roasted broccoli
- Garden salad
- Macaroni and cheese
- Baked potato wedges
If you’re serving them at a party, arrange the sliders on a large platter with small bowls of dipping sauces.
Best Dipping Sauces
| Sauce | Flavor |
|---|---|
| Garlic aioli | Rich and garlicky |
| Ranch dressing | Creamy and tangy |
| BBQ sauce | Sweet and smoky |
| Honey mustard | Sweet with a tangy finish |
| Marinara sauce | Savory tomato flavor |
| Spicy mayonnaise | Creamy with a little heat |
For a classic cheeseburger-inspired combination, try mixing equal parts ketchup and mayonnaise with a small amount of mustard.
How to Store and Reheat Cheesy Biscuit Sliders
If you have leftovers, you can refrigerate or freeze them for another day.
Proper storage helps preserve the biscuit texture and keeps the meat filling safe to eat.
Refrigerating Leftover Sliders
Allow the sliders to cool briefly, then transfer them to an airtight container.
Refrigerate within two hours of cooking and store at 40°F (4°C) or below.
They’ll keep for approximately 3–4 days.
Can You Freeze Cheesy Biscuit Sliders?
Yes. These sliders freeze well after baking.
First, cool them completely in the refrigerator. Wrap each slider individually in plastic wrap or freezer-safe wrapping, then place them in a freezer bag.
For the best texture and flavor, use them within 2–3 months.
Best Ways to Reheat
| Method | Temperature | Approximate Time |
|---|---|---|
| Oven | 350°F | 10–15 minutes |
| Air fryer | 325°F | 4–7 minutes |
| Microwave | Medium power | 30–60 seconds |
| Oven, from frozen | 350°F | 20–30 minutes |
Reheating times depend on the size of your sliders and your appliance. Always heat leftovers until the center reaches 165°F (74°C).
The oven or air fryer usually produces a better biscuit texture than the microwave.
Make-Ahead Cheesy Biscuit Sliders for Parties
If you’re hosting a gathering, preparing part of this recipe ahead of time can save you valuable kitchen time.
Prepare the Beef Filling in Advance
Cook the ground beef, onion, garlic, and seasonings up to two days before your event.
Refrigerate the filling in a sealed container.
When you’re ready to bake, flatten the biscuits, add the filling and cheese, and seal them as directed.
If the filling is cold, you may need a little additional baking time.
Keeping Sliders Warm for Guests
For parties, you can keep baked sliders warm in an oven that maintains a safe holding temperature.
The sliders should remain at or above 140°F (60°C).
Cover loosely with foil to help prevent the tops from drying out.
For the freshest taste, serve smaller batches rather than leaving the entire tray out for an extended period.
Common Mistakes to Avoid
Even though this Cheesy Biscuit Sliders recipe is simple, a few mistakes can affect the finished results.
Overstuffing the Biscuits
Too much filling makes the dough difficult to seal and can cause the sliders to burst open during baking.
Divide your beef and cheese evenly instead of trying to fit too much into each biscuit.
Not Draining the Ground Beef
Excess grease can soak into the biscuit dough, creating a heavy, soggy texture.
Always drain the beef before assembling.
Using Dough That’s Too Thin
If you flatten your biscuits too much, the dough may tear when you fold it around the filling.
Keep the center thick enough to support the meat and cheese.
Removing the Sliders Too Early
Golden tops don’t always mean the centers are completely baked.
Check the dough near the filling before removing the sliders from the oven.
If necessary, bake for a few additional minutes.
Cheesy Biscuit Sliders Nutrition Information
The nutritional content of your sliders depends on the type of biscuit dough, fat percentage of the ground beef, and amount of cheese you use.
Estimated Nutrition Per Slider
| Nutrient | Approximate Amount |
|---|---|
| Calories | 350–450 kcal |
| Protein | 18–23 g |
| Carbohydrates | 24–32 g |
| Total fat | 20–30 g |
| Saturated fat | 9–13 g |
| Sodium | 650–950 mg |
These are broad estimates rather than a verified calculation. Actual values depend on the exact brands, quantities, and portion sizes.
How to Make Your Sliders Lighter
You can adjust the recipe without sacrificing too much flavor.
Try using lean ground beef or ground turkey, reducing the cheese slightly, or choosing smaller biscuits.
Serving your sliders with roasted vegetables or a fresh salad is another easy way to balance the meal.
Frequently Asked Questions About Cheesy Biscuit Sliders
Can I Make Cheesy Biscuit Sliders Ahead of Time?
Yes. You can prepare the beef filling up to two days ahead and keep it refrigerated. Assemble and bake the biscuits shortly before serving for the best texture.
What Is the Best Cheese for Cheesy Biscuit Sliders?
Cheddar and mozzarella are excellent choices. Cheddar adds bold flavor, while mozzarella provides a creamy, stretchy texture. Monterey Jack and provolone also work well.
Can I Make Cheesy Biscuit Sliders in an Air Fryer?
Yes. Try cooking them at 325°F (163°C) for approximately 10–15 minutes, depending on their size. Work in small batches and check that the biscuit centers are fully baked. Air fryer cooking times vary.
Can I Use Homemade Biscuit Dough?
Absolutely. Homemade biscuit dough works well as long as it’s soft enough to stretch around the filling. You may need to adjust the baking time depending on the thickness of your dough.
How Do I Keep Cheesy Biscuit Sliders from Falling Apart?
Avoid overfilling the dough, pinch the seams tightly, and bake the sliders seam-side down. Keeping the filling relatively dry also helps prevent splitting.
Can I Freeze Cheesy Biscuit Sliders After Baking?
Yes. Once cooled, wrap the sliders individually and freeze them in airtight packaging. Reheat until thoroughly hot, reaching 165°F (74°C) in the center.
What Meat Works Best in Cheesy Biscuit Sliders?
Ground beef is a classic choice because it cooks quickly and pairs beautifully with cheddar cheese. You can also use cooked shredded chicken, ground turkey, or thinly sliced steak.
How Long Do Cheesy Biscuit Sliders Take to Bake?
Most sliders take approximately 15–20 minutes at 375°F (190°C). Larger biscuits or thicker fillings may require additional time.
Conclusion: Make These Cheesy Biscuit Sliders Your New Family Favorite
When you need a quick dinner, a crowd-pleasing appetizer, or a satisfying snack, these Cheesy Biscuit Sliders are an easy recipe to keep in your collection.
The combination of fluffy golden biscuits, seasoned ground beef, melted cheddar, mozzarella, and garlic butter makes every bite rich and comforting. You get all the flavors of a homemade cheeseburger wrapped inside a warm, buttery biscuit.
What makes this recipe even better is its flexibility. You can prepare the filling ahead of time, experiment with different cheeses, or switch to chicken, turkey, or steak whenever you want something different.
Serve your sliders fresh from the oven with your favorite dipping sauce, and don’t be surprised if the entire tray disappears before dinner is over.
Now it’s your turn! Try these Cheesy Biscuit Sliders for your next family dinner or gathering. Save this recipe so you can make it again, share it with a friend who loves cheesy comfort food, and leave a comment telling us which filling or dipping sauce you enjoyed most!

Cheesy Biscuit Sliders Recipe





 Want an easier way to get my recipes? ❤️