Nun’s Puffs Recipe
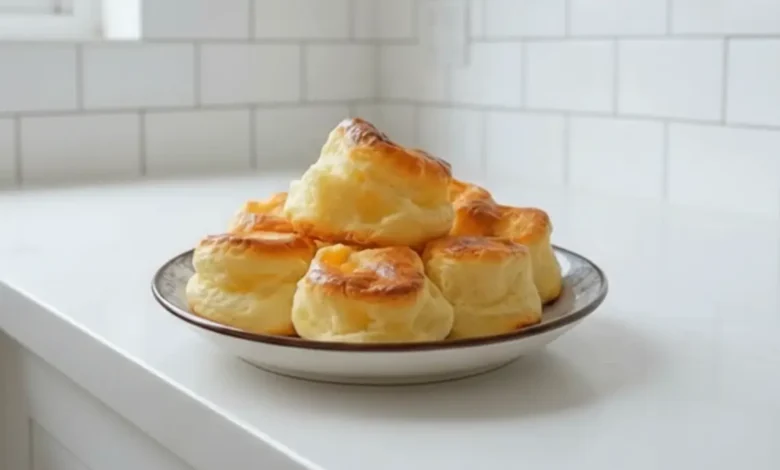
There’s a certain warmth and nostalgia that fills the kitchen when you’re baking a batch of Nun’s Puffs. This traditional pastry, light and airy, carries with it more than just a delightful flavor—it’s a taste of history, a little slice of joy that connects generations. With every bite, you’re transported to a simpler time when pastries were a handmade treat, shared among friends and family. Whether you’re baking them for the first time or returning to this comforting recipe from your childhood, Nun’s Puffs offer a unique combination of delicate flavor and texture that’s perfect for any occasion.
This recipe is an easy-to-follow guide that will help you create these delectable treats from scratch. Whether you want to enjoy them at breakfast with a cup of tea, as an afternoon snack, or as a sweet addition to a special event, Nun’s Puffs are versatile, simple, and utterly delicious. Let’s dive into everything you need to know about this treasured pastry, from its history to step-by-step instructions on how to make them.
What Are Nun’s Puffs?

The Origins of Nun’s Puffs
Nun’s Puffs are a centuries-old pastry that has its roots in traditional French and English cuisine. The exact origin of the name is somewhat elusive, but one theory suggests that the puff-shaped pastries were named after the distinctive habits worn by nuns. These small, puffed pastries were believed to be simple and humble—just as nuns led simple and humble lives in their cloisters.
Although the pastry’s precise history is unclear, it has been passed down through generations, becoming a beloved treat in many homes, particularly in Europe. The light, airy texture and slightly sweet flavor make Nun’s Puffs a comforting pastry for any time of day.
Why Are Nun’s Puffs So Special?
There’s something undeniably special about Nun’s Puffs. These pastries stand out for several reasons:
- Airy and Light Texture: Thanks to the clever combination of ingredients and the careful mixing process, Nun’s Puffs have a lightness that melts in your mouth.
- Sweet and Subtle Flavor: The flavor of Nun’s Puffs is not overpowering but subtly sweet, making them perfect for a variety of occasions.
- Versatility: You can enjoy them as a breakfast treat, a dessert, or a delightful afternoon snack with a hot cup of tea.
- Quick and Easy: Despite their impressive look and delicate texture, Nun’s Puffs are surprisingly easy to make. They don’t require complicated techniques or special tools.
Whether you’re looking for a simple yet delicious dessert or an elegant brunch offering, Nun’s Puffs never disappoint. They are a true testament to the idea that sometimes, the simplest recipes are the most rewarding.
Nun’s Puffs Recipe: Ingredients You’ll Need
Key Ingredients for Nun’s Puffs
Before you begin baking your Nun’s Puffs, let’s take a look at the ingredients you’ll need. These simple ingredients combine to create the light, fluffy texture and delightful flavor that make Nun’s Puffs such a beloved treat.
| Ingredient | Quantity | Notes |
|---|---|---|
| All-purpose flour | 1 cup | Sifted for lightness |
| Butter | 4 tbsp | Melted |
| Sugar | 1/4 cup | Granulated |
| Eggs | 2 large | Room temperature |
| Milk | 1/2 cup | Full-fat preferred |
| Baking powder | 1 tsp | |
| Salt | Pinch | |
| Vanilla extract | 1 tsp | |
| Powdered sugar | For dusting | Optional, for garnish |
How to Choose the Best Ingredients for Nun’s Puffs

The quality of the ingredients you use for Nun’s Puffs plays a significant role in achieving the best results. Here’s how to ensure you’re choosing the right ingredients:
- Fresh Eggs and Dairy: For the best flavor, use fresh eggs and full-fat dairy products. These ingredients help create a rich and creamy texture.
- Sifting Flour: It may seem like an extra step, but sifting your flour is crucial for ensuring the batter is light and fluffy. This process prevents any clumps from forming, allowing your Nun’s Puffs to rise properly in the oven.
- Butter Quality: Use high-quality butter with a rich flavor. It adds the necessary richness to the batter and helps create that golden, flaky texture you’re looking for.
How to Make Nun’s Puffs: Step-by-Step Instructions
Now that you have your ingredients ready, it’s time to get baking! Follow these step-by-step instructions to make your Nun’s Puffs just right.
Step 1: Prepare the Oven and Baking Sheet
Start by preheating your oven to 375°F (190°C). This temperature ensures that the Nun’s Puffs cook evenly and puff up to their golden, light perfection. Line a baking sheet with parchment paper to make cleanup easier and to prevent sticking.
Step 2: Mix Dry Ingredients
In a medium-sized bowl, combine 1 cup of sifted all-purpose flour, 1 teaspoon of baking powder, and a pinch of salt. Use a whisk to mix these dry ingredients together evenly. The key here is to ensure that the baking powder is evenly distributed, which helps your Nun’s Puffs rise in the oven.
Step 3: Whisk Wet Ingredients
In a separate bowl, crack 2 large eggs and add 1/4 cup of granulated sugar. Use a whisk or an electric mixer to beat the eggs and sugar until the mixture becomes light and smooth. Add 1/2 cup of milk, 4 tablespoons of melted butter, and 1 teaspoon of vanilla extract. Continue whisking until everything is fully incorporated.
Step 4: Combine and Mix
Gradually add the dry ingredients to the wet ingredients. Stir gently to combine, making sure not to overmix. Overmixing the batter can cause your Nun’s Puffs to become dense and heavy. The batter should be thick, but it should still fall easily from a spoon.
Step 5: Spoon and Bake
Spoon the batter onto your prepared baking sheet. You can use a tablespoon to scoop even portions of the batter, spacing them about 2 inches apart. This allows enough room for the Nun’s Puffs to expand as they bake. Bake for 15-20 minutes, or until they’re golden brown and puffed up.
Step 6: Garnish and Serve
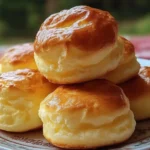
Once your Nun’s Puffs are baked to perfection, remove them from the oven and let them cool for a few minutes. Dust them lightly with powdered sugar for a beautiful, sweet finish. Serve warm and enjoy with your favorite hot beverage or as a delicious dessert after a meal.
If you’re a fan of puffed treats, you might also enjoy our delicious Cheesy Mashed Potato Puffs, perfect for any gathering or snack time.
Tips for Perfect Nun’s Puffs
How to Make Nun’s Puffs Extra Light and Fluffy
To ensure your Nun’s Puffs turn out light and fluffy, be sure to follow these tips:
- Do Not Overmix: Overmixing the batter will result in dense Nun’s Puffs. Stir the ingredients until just combined.
- Sift Your Flour: Sifting the flour ensures a light, airy texture by removing any lumps and aerating the flour.
- Room Temperature Ingredients: Make sure your eggs and milk are at room temperature before mixing them into the batter. This helps create a smoother, more even texture.
For another delectable puff pastry treat, be sure to try our Golden Seafood Lobster Puff Pastry Cups, a luxurious bite-sized appetizer perfect for any special occasion.
Storing Leftover Nun’s Puffs
If you happen to have any leftover Nun’s Puffs, store them in an airtight container at room temperature for up to 2 days. To keep them fresh, you can also freeze them for later use. Simply place them in a freezer-safe container, and they’ll last for up to 2 months. Reheat them in the oven at 350°F (175°C) for about 10 minutes, and they’ll taste just as fresh as the day you made them!
Common Mistakes to Avoid
To avoid common mistakes and ensure your Nun’s Puffs are perfect every time, keep these tips in mind:
- Overmixing the Batter: Mix the ingredients gently. Overmixing can cause the dough to lose its lightness.
- Not Preheating the Oven: Always make sure your oven is preheated before placing the Nun’s Puffs in. This helps them rise and bake evenly.
- Incorrect Oven Temperature: If your oven is too hot, the outside of the Nun’s Puffs may brown too quickly while the inside remains raw. Conversely, a low oven temperature will cause them to spread instead of puffing up.
Variations of Nun’s Puffs You Can Try
Sweet Variations
If you want to switch things up, here are a few sweet variations of Nun’s Puffs to try:
- Chocolate Chips: Add 1/4 cup of mini chocolate chips to the batter for a rich, chocolatey twist.
- Dried Fruit: Add chopped dried fruits like cranberries or raisins for an added burst of sweetness.
- Maple Syrup Drizzle: After baking, drizzle your Nun’s Puffs with warm maple syrup for an extra decadent touch.
Savory Variations
If you prefer savory pastries, here are some ideas for a more savory twist on Nun’s Puffs:
- Cheese and Herbs: Add 1/4 cup of grated cheddar cheese and a teaspoon of dried herbs like thyme or rosemary to the batter.
- Garlic Butter: After baking, brush the Nun’s Puffs with melted garlic butter for a savory, aromatic treat.
Gluten-Free Nun’s Puffs
For a gluten-free version of Nun’s Puffs, simply substitute the all-purpose flour with a gluten-free flour blend. You can also use non-dairy milk and butter for a dairy-free version.
FAQ About Nun’s Puffs Recipe
What Are Nun’s Puffs Made Of?
Nun’s Puffs are made from a simple mixture of flour, butter, eggs, milk, and sugar. Baking powder is added for lift, giving them their signature airy texture.
Can I Make Nun’s Puffs in Advance?
Yes, you can make Nun’s Puffs ahead of time. Store them in an airtight container for up to two days, or freeze them for up to two months. Just reheat them in the oven before serving.
Why Did My Nun’s Puffs Not Rise?
If your Nun’s Puffs didn’t rise properly, it could be due to overmixing the batter or not preheating the oven properly. Make sure to stir gently and allow the oven to fully heat before baking.
Can I Make Nun’s Puffs Without Eggs?
Yes, you can use egg substitutes like applesauce or flax eggs in place of the eggs to make a vegan version of Nun’s Puffs.
Conclusion: Bring Joy to Your Kitchen with Nun’s Puffs
Making Nun’s Puffs is a delightful way to embrace a time-honored tradition while filling your kitchen with delicious aromas. These simple yet elegant pastries are a great way to add a touch of comfort to your everyday life. Whether you’re serving them at breakfast, as a dessert, or just as a snack, Nun’s Puffs are sure to become a new favorite in your recipe collection.
So, what are you waiting for? Get your ingredients, roll up your sleeves, and bake your way to a batch of warm, golden Nun’s Puffs. Enjoy the process, savor the results, and share the joy with those you love!