
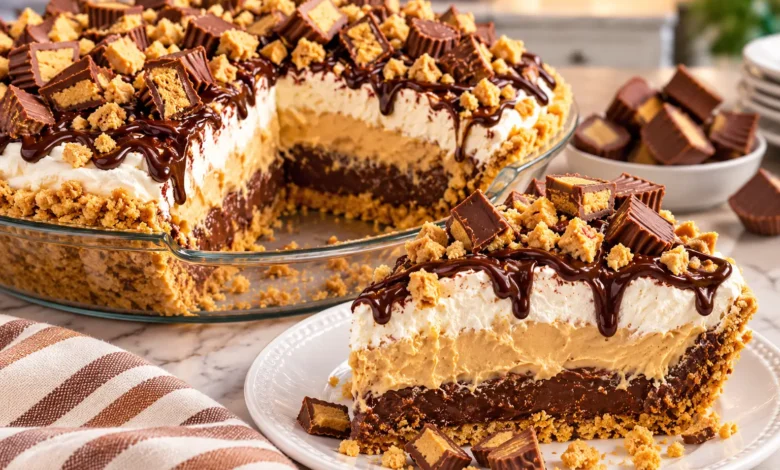
There are certain desserts that make you stop the moment they reach the table, and Decadent Giant Reese’s Peanut Butter Cup Pie is one of them. If you’re the person who always reaches for a peanut butter cup first, this dessert takes everything you already love about that classic chocolate-and-peanut-butter combination and turns it into one impressive, sliceable treat.
Picture cutting through a smooth layer of chocolate and discovering a thick, creamy peanut butter center underneath. Every bite gives you that familiar contrast between rich chocolate, sweet peanut butter, and just enough saltiness to keep you coming back for another taste.
The best part? It looks much more complicated than it actually is.
You don’t need advanced baking skills or elaborate decorating techniques. With chocolate, peanut butter, powdered sugar, butter, and a few simple steps, you can create a showstopping dessert for birthdays, holidays, family gatherings, potlucks, or those evenings when an ordinary dessert simply won’t do.
What Is Decadent Giant Reese’s Peanut Butter Cup Pie?
A Decadent Giant Reese’s Peanut Butter Cup Pie is a homemade dessert inspired by the familiar chocolate-covered peanut butter candy. Instead of making individual candies, you create one oversized version that can be cut and served like a pie.
Unlike a traditional peanut butter pie with a crumb crust and fluffy filling, this version is much closer to a giant piece of candy.
You get three main components:
- A rich chocolate base
- A thick and creamy peanut butter center
- A smooth chocolate layer covering the top
Once everything has chilled and set, you can remove the dessert from its pan and cut it into wedges.
What Makes This Giant Peanut Butter Cup Pie Special?
Presentation is a big part of the appeal.
Using a fluted tart pan gives the edges those recognizable ridges associated with peanut butter cups. Once you place the finished dessert on a serving plate, it looks like someone supersized a chocolate peanut butter cup.
You’ll also appreciate that this is largely a make-ahead dessert. Instead of trying to finish it minutes before guests arrive, you can assemble it earlier and allow the refrigerator to do most of the remaining work.
Other reasons you may love this recipe include:
- Simple ingredients
- No complicated cake decorating
- Easy preparation
- Rich chocolate and peanut butter flavor
- Excellent make-ahead potential
- An impressive presentation with little effort
What Does Giant Reese’s Peanut Butter Cup Pie Taste Like?
Expect a rich combination of chocolate and sweet, slightly salty peanut butter.
The chocolate develops a firmer texture once chilled, while the peanut butter center remains softer. That contrast is what gives each slice its candy-like character.
Using milk chocolate creates a sweeter result, while semi-sweet chocolate adds deeper cocoa flavor and helps balance the sweetness of the filling.
Ingredients for Decadent Giant Reese’s Peanut Butter Cup Pie
You only need a handful of familiar ingredients to make this dessert.
| Ingredient | Amount | Purpose |
|---|---|---|
| Milk or semi-sweet chocolate | 3 cups | Creates the outer chocolate layers |
| Creamy peanut butter | 2 cups | Forms the peanut butter center |
| Powdered sugar | 1½ cups | Sweetens and thickens the filling |
| Unsalted butter, softened | ½ cup | Adds richness and a softer texture |
| Vanilla extract | 1 teaspoon | Adds depth to the filling |
| Salt | ¼ teaspoon | Balances the sweetness |
The exact amount of chocolate you need can vary slightly depending on the diameter and depth of your pan.
Best Chocolate to Use
Your chocolate choice changes the personality of the entire dessert.
If you want a sweeter candy-inspired flavor, milk chocolate is a natural choice. If you prefer your desserts slightly less sweet, semi-sweet chocolate works beautifully.
You can also combine the two.
For example, using half milk chocolate and half semi-sweet chocolate gives you sweetness without making the finished pie overly sugary.
Chocolate melting wafers are another convenient option because they tend to melt smoothly.
Choosing the Right Peanut Butter
For the most predictable texture, use smooth conventional peanut butter.
Natural peanut butter can separate, leaving a layer of oil at the top of the jar. That additional oil may make your filling softer than expected.
This doesn’t mean natural peanut butter can never work, but you’ll need to make sure it’s thoroughly mixed before measuring it.
Can You Use Crunchy Peanut Butter?
Absolutely.
Crunchy peanut butter adds small peanut pieces throughout the center, creating extra texture. If you enjoy a little crunch in your peanut butter cups, you may actually prefer this variation.
Equipment You’ll Need
You don’t need a kitchen full of specialty equipment.
Gather:
- 9-inch fluted tart pan or similar pie pan
- Large mixing bowl
- Microwave-safe bowl or double boiler
- Rubber spatula
- Measuring cups
- Measuring spoons
- Offset spatula or large spoon
- Sharp knife for serving
Choosing the Best Pan
A tart pan with fluted sides gives you the most dramatic candy-inspired appearance.
A removable bottom also makes releasing the finished dessert considerably easier.
If you don’t own a tart pan, don’t abandon the recipe. A springform pan or standard pie pan can work, although your finished dessert won’t have exactly the same ridged exterior.
How to Make Decadent Giant Reese’s Peanut Butter Cup Pie
The secret is building the dessert one layer at a time.
Step 1: Melt the Chocolate
Place your chocolate in a microwave-safe bowl.
Microwave it in short intervals, stirring thoroughly between each interval. Stop heating as soon as the chocolate becomes smooth.
Chocolate can scorch when overheated, so patience matters here.
You can also melt your chocolate using a double boiler if you prefer greater temperature control.
Step 2: Create the Chocolate Base
Pour approximately half of your melted chocolate into the tart pan.
Spread it evenly across the bottom, then carefully bring some chocolate up the sides.
You want enough chocolate to create a sturdy shell without making it excessively thick.
Place the pan in the refrigerator until the chocolate becomes firm.
Step 3: Prepare the Peanut Butter Filling
While your chocolate is chilling, make the center.
Add the softened butter and peanut butter to a mixing bowl. Beat or stir them together until smooth.
Add the powdered sugar gradually rather than dumping it in all at once.
Mix in the vanilla and salt.
Your finished mixture should be thick enough to hold its shape but soft enough to spread.
Step 4: Add the Peanut Butter Layer
Remove your chilled chocolate shell from the refrigerator.
Spoon the peanut butter filling over the chocolate.
Spread it carefully into an even layer. Avoid filling the pan completely to the top because you’ll need room for your final chocolate layer.
Smooth the surface with your spatula.
Step 5: Cover With Chocolate
Pour the remaining melted chocolate over the peanut butter filling.
Start in the center and spread it toward the edges until the peanut butter is completely covered.
Gently tapping the pan against the counter can help level the chocolate and remove obvious air pockets.
Step 6: Chill Until Firm
Transfer your giant peanut butter cup pie to the refrigerator.
Allow it to chill until the chocolate has completely set and the center feels firm.
Depending on the thickness of your layers, this may take a few hours. Chilling overnight is also convenient if you’re preparing dessert ahead of an event.
Tips for the Best Giant Reese’s Peanut Butter Cup Pie
A simple recipe can still benefit from a few small tricks.
For the best results:
- Don’t overheat your chocolate.
- Use softened butter rather than cold butter.
- Add powdered sugar gradually.
- Smooth each layer before moving to the next.
- Give the chocolate enough time to set.
- Let the finished pie sit briefly before cutting.
- Cut smaller portions because the dessert is very rich.
How to Keep the Chocolate From Cracking
One of the biggest challenges is slicing through chilled chocolate without shattering the shell.
Instead of cutting the dessert immediately after taking it from the refrigerator, allow it to sit briefly at room temperature.
You can also warm your knife under hot water. Dry it completely before cutting.
The slightly warm blade moves through the chocolate more cleanly.
How to Get Clean Slices
Use a large, sharp knife.
After every cut, wipe the blade clean before making the next one. If necessary, warm it again.
This little extra step can make a major difference when you’re preparing the pie for photographs or a special occasion.
Common Mistakes to Avoid
Overheating Your Chocolate
Chocolate doesn’t need aggressive heat.
Microwaving it for too long can make it thick or scorched. Short heating intervals followed by plenty of stirring are safer.
Making the Filling Too Runny
Your peanut butter center needs enough structure to support the chocolate topping.
If your filling seems too loose, adding a small amount of additional powdered sugar can help.
Cutting the Pie While It’s Extremely Cold
Very cold chocolate is more likely to crack.
Giving your dessert a short rest before slicing helps the chocolate soften slightly.
Making the Chocolate Too Thick
More chocolate isn’t necessarily better.
An extremely thick shell can become difficult to cut and may overwhelm the peanut butter center.
Aim for an even layer that is sturdy but still easy to slice.
Giant Peanut Butter Cup Pie Variations
Once you understand the basic recipe, you can easily change it.
Dark Chocolate Peanut Butter Cup Pie
Replace milk or semi-sweet chocolate with dark chocolate.
The stronger cocoa flavor creates a less-sweet dessert and provides a bold contrast with the peanut butter.
Crunchy Peanut Butter Version
Use crunchy peanut butter or add finely chopped roasted peanuts to your filling.
Oreo Peanut Butter Cup Pie
Add a thin layer of crushed chocolate sandwich cookies between the chocolate base and peanut butter filling.
This creates an additional crunchy texture.
Salted Chocolate Peanut Butter Pie
Sprinkle a small amount of flaky sea salt over the top before the chocolate completely sets.
Salt helps contrast the sweetness and intensifies the chocolate flavor.
Mini Peanut Butter Cup Pies
Instead of creating one enormous dessert, divide your ingredients among small tart pans.
Individual versions are particularly useful for parties because guests don’t have to wait for the dessert to be sliced.
How to Decorate Your Giant Peanut Butter Cup Pie
The glossy chocolate top already looks impressive, so decorating can remain simple.
Try topping your pie with:
- Chopped peanut butter cups
- Roasted peanuts
- Chocolate curls
- Peanut butter drizzle
- Chocolate drizzle
- Flaky sea salt
- Whipped cream
Birthday and Celebration Ideas
For birthdays, place the finished dessert on a cake stand and decorate the center with chopped peanut butter cups.
You can even add candles just as you would with a birthday cake.
For holidays, use seasonal decorations around the serving platter rather than covering the entire pie. This allows the giant peanut butter cup appearance to remain the star.
How to Store Decadent Giant Reese’s Peanut Butter Cup Pie
Keep your finished dessert covered so the chocolate and filling don’t absorb odors from other foods.
For a chilled pie, keep your refrigerator at 40°F or below, consistent with USDA refrigeration guidance.
Refrigerator Storage
Place leftover slices in an airtight container or cover the entire dessert securely.
Although ordinary shelf-stable peanut butter itself does not require refrigeration, your finished dessert should be stored according to the needs of the complete recipe and any perishable additions you use.
For the best eating texture, remove a slice shortly before serving so the chocolate isn’t extremely hard.
Can You Freeze Giant Peanut Butter Cup Pie?
Yes, freezing is useful when you want to prepare your dessert well ahead of time.
Wrap the whole pie or individual slices carefully, then place them inside a freezer-safe container.
When you’re ready to serve it, transfer it to the refrigerator and let it thaw gradually. Slow thawing helps preserve the texture of both the chocolate and peanut butter layers.
What to Serve With Giant Reese’s Peanut Butter Cup Pie
Because this dessert is rich, simple accompaniments work best.
Try serving it with:
- Fresh strawberries
- Fresh raspberries
- Vanilla ice cream
- Lightly sweetened whipped cream
- Cold milk
- Hot coffee
Fresh berries are particularly useful because their acidity provides contrast to the rich chocolate and peanut butter.
How Large Should Each Slice Be?
Keep your portions relatively small.
This isn’t a light, fluffy pie. You’re essentially eating a thick chocolate-and-peanut-butter confection in pie form.
A narrow wedge is usually plenty, especially if you’re serving it after a full meal.
Giant Reese’s Peanut Butter Cup Pie vs. Traditional Peanut Butter Pie
Although both desserts feature peanut butter, their textures and presentations are quite different.
| Feature | Giant Peanut Butter Cup Pie | Traditional Peanut Butter Pie |
|---|---|---|
| Base | Chocolate shell | Cookie or graham cracker crust |
| Filling | Dense peanut butter center | Usually soft and creamy |
| Texture | Candy-like | Pie-like |
| Chocolate | Major component | Often optional |
| Appearance | Oversized candy | Traditional pie |
| Serving style | Small rich wedges | Standard pie slices |
If you want something creamy and airy, a traditional peanut butter pie may suit you.
If you’re craving something that feels closer to an enormous chocolate peanut butter cup, this recipe is the one you’ll want to make.
Frequently Asked Questions About Decadent Giant Reese’s Peanut Butter Cup Pie
Can I Make Decadent Giant Reese’s Peanut Butter Cup Pie Ahead of Time?
Yes. In fact, making it ahead gives the chocolate and filling plenty of time to become firm.
Prepare the dessert the day before your gathering, cover it, and keep it chilled until you’re ready to serve.
Does Giant Reese’s Peanut Butter Cup Pie Need to Be Refrigerated?
Refrigeration is the easiest way to keep the assembled pie firm and maintain clean chocolate and peanut butter layers. If you add perishable ingredients such as cream or cream cheese in a variation, refrigeration becomes especially important; USDA guidance recommends keeping perishable foods at 40°F or below.
Can I Use Milk Chocolate Instead of Semi-Sweet Chocolate?
Yes.
Milk chocolate produces a sweeter, creamier candy-style flavor.
Semi-sweet chocolate creates a deeper cocoa flavor and helps balance the sweet peanut butter filling.
You can also combine both.
Why Does My Chocolate Crack When I Cut the Pie?
Your pie may simply be too cold.
Allow it to rest briefly outside the refrigerator, then cut it with a sharp knife that has been warmed and dried.
Also check the thickness of your chocolate layers. Very thick chocolate is naturally harder to slice cleanly.
Can I Use Natural Peanut Butter?
You can, but you’ll need to mix it extremely well first.
Natural peanut butter tends to separate, which can make the filling oily or softer.
For the easiest and most consistent results, regular creamy peanut butter is usually the simpler option.
Can I Make Decadent Giant Reese’s Peanut Butter Cup Pie Without a Tart Pan?
Yes.
A springform pan works well because its removable sides make releasing the dessert easier.
A standard pie dish can also work, although serving may be slightly more difficult and you won’t get the distinctive fluted edges.
How Do I Keep the Peanut Butter Filling Creamy?
Start with softened butter and room-temperature peanut butter.
Combine them thoroughly before gradually adding your powdered sugar.
Avoid adding too much powdered sugar at once because your filling can quickly become dry or crumbly.
Can I Freeze Decadent Giant Reese’s Peanut Butter Cup Pie?
Yes. Wrap it securely to minimize exposure to air and freezer odors. For easier serving later, you can freeze individual wedges rather than the entire dessert.
Thaw your slices in the refrigerator before serving.
Conclusion: Make Your Own Decadent Giant Reese’s Peanut Butter Cup Pie
When chocolate and peanut butter are already one of your favorite combinations, there’s no reason to settle for an ordinary dessert.
Decadent Giant Reese’s Peanut Butter Cup Pie takes that familiar candy-inspired flavor and transforms it into a centerpiece you can proudly bring to birthdays, holidays, potlucks, family dinners, or weekend gatherings.
You get a smooth chocolate exterior, a thick peanut butter center, and an impressive appearance without spending hours decorating a complicated cake.
Better yet, you can customize it. Try dark chocolate, crunchy peanut butter, chopped peanuts, cookie crumbs, sea salt, or extra chocolate drizzle until you’ve created your own favorite version.
Save this Decadent Giant Reese’s Peanut Butter Cup Pie recipe so it’s ready the next time your chocolate-and-peanut-butter craving hits.
If you make it, leave a comment and tell us how your giant peanut butter cup turned out. And don’t forget to share the recipe with the biggest chocolate-and-peanut-butter lover you know!

Decadent Giant Reese’s Peanut Butter Cup Pie



 Want an easier way to get my recipes? ❤️