
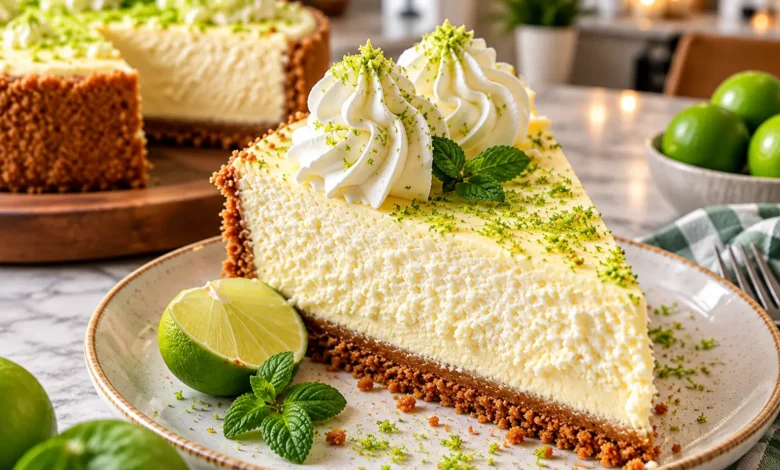
There is something about a cold slice of Key Lime Pie that instantly feels refreshing. You cut through a cloud of whipped cream, reach the silky lime filling, and finish with that buttery graham cracker crust underneath. Every bite gives you a little sweetness followed by a bright citrus flavor that keeps the dessert from feeling too heavy.
It is also the kind of dessert you can bring out after Sunday dinner, serve at a summer cookout, or prepare ahead when friends and family are coming over. You don’t need complicated decorating skills or a long ingredient list to make it look impressive.
This Key Lime Pie recipe combines a crisp homemade graham cracker crust with a creamy filling made from sweetened condensed milk, egg yolks, fresh Key lime juice, and zest. After baking, the pie chills until the filling becomes cool, smooth, and easy to slice.
If you love desserts that balance sweet and tart flavors, this one deserves a place in your recipe collection.
What Is Key Lime Pie?
Key Lime Pie is a citrus dessert closely associated with the Florida Keys. What makes it stand out from other lime desserts is the combination of a crumbly crust and a rich filling flavored with Key lime juice.
The filling is surprisingly simple. Sweetened condensed milk provides sweetness and richness, while Key lime juice cuts through that richness with its sharp citrus flavor. Egg yolks help give the baked filling its structure.
Once everything is chilled, you get several contrasting textures in a single bite.
The Three Main Layers of Key Lime Pie
A classic version can be divided into three simple parts:
- Graham cracker crust: Crisp, buttery, and lightly sweet.
- Key lime filling: Smooth, rich, tart, and creamy.
- Whipped topping: Soft and airy, helping balance the citrus flavor.
The contrast is one of the reasons this pie is so satisfying. The crust adds crunch while the filling stays silky and creamy.
Why You’ll Love This Key Lime Pie Recipe
You don’t have to save this recipe for a special occasion. It is simple enough to make whenever you’re craving a homemade citrus dessert.
Here are a few reasons you’ll want to keep it:
- It uses simple, easy-to-find ingredients.
- You get both sweet and tart flavors in every slice.
- The homemade graham cracker crust requires very little preparation.
- You can prepare the pie ahead of time.
- Chilling does most of the finishing work for you.
- Fresh lime zest adds plenty of citrus aroma.
- Whipped cream balances the tangy filling.
- It makes an attractive dessert without complicated decorating.
Because the pie needs time in the refrigerator, it is especially convenient when you’re entertaining. You can make it earlier, clean your kitchen, and have dessert waiting when you need it.
Key Lime Pie Ingredients
You only need a handful of ingredients to create the crust, filling, and topping.
For the strongest citrus flavor, use fresh Key lime juice when you can find Key limes. Regular Persian limes can also be used when Key limes aren’t readily available, although the flavor will be somewhat different.
Complete Key Lime Pie Ingredients Table
| Ingredient | Amount | Purpose |
|---|---|---|
| Graham cracker crumbs | 1 ½ cups | Creates the crisp crust |
| Granulated sugar | ¼ cup | Sweetens the crust |
| Unsalted butter, melted | 6 tablespoons | Holds the crumbs together |
| Sweetened condensed milk | 2 cans (14 oz each) | Creates the creamy filling |
| Large egg yolks | 4 | Adds richness and structure |
| Key lime juice | ¾ cup | Provides the tart lime flavor |
| Key lime zest | 1 tablespoon | Adds fresh citrus aroma |
| Heavy whipping cream | 1 cup | Makes the topping |
| Powdered sugar | 3 tablespoons | Sweetens the whipped cream |
| Vanilla extract | ½ teaspoon | Adds flavor to the topping |
| Lime slices or zest | Optional | Garnish |
Key Limes vs. Regular Limes
Key limes are generally smaller than the Persian limes commonly sold in supermarkets. Because they’re small, you’ll usually need several of them to collect enough juice for an entire pie.
Don’t worry if you can’t find them. Regular fresh limes can still produce a delicious homemade lime pie.
If you’re using fresh fruit, zest your limes before cutting and juicing them. Trying to zest an already squeezed lime is much more difficult.
How Much Lime Juice Do You Need?
For this recipe, you’ll need approximately ¾ cup of lime juice.
Juice the limes into a measuring cup rather than estimating. Citrus fruits don’t all contain the same amount of juice, so measuring gives you a much more consistent filling.
How to Make Key Lime Pie Step by Step
Although the finished dessert looks impressive, the preparation is straightforward.
Step 1 – Prepare the Graham Cracker Crust
Preheat your oven to 350°F (175°C).
Combine the graham cracker crumbs and granulated sugar in a medium bowl. Pour in the melted butter and stir until all the crumbs are evenly moistened.
Transfer the mixture to a 9-inch pie dish.
Press the crumbs firmly across the bottom and up the sides of the dish. The bottom of a measuring cup works well for compacting the crumbs evenly.
Bake the crust for approximately 8–10 minutes.
Remove it from the oven and allow it to cool slightly while you prepare your filling.
Step 2 – Make the Key Lime Pie Filling
Place the egg yolks in a large mixing bowl and whisk until smooth.
Add the sweetened condensed milk and continue whisking until combined.
Slowly mix in the Key lime juice followed by the lime zest.
You don’t need to aggressively beat the filling. Mix just until everything looks smooth and evenly incorporated.
The mixture should begin to thicken slightly as the citrus juice combines with the condensed milk.
Step 3 – Fill and Bake the Pie
Pour the Key lime filling into your prepared graham cracker crust.
Use a spatula to spread the filling evenly.
Bake at 350°F for approximately 15–18 minutes, or until the outside is set and the center still has a slight jiggle.
Because this recipe contains egg yolks, proper cooking matters. USDA food-safety guidance recommends cooking egg mixtures to 160°F.
Avoid baking until the filling becomes completely firm. It will continue to settle as it cools and will become considerably firmer during refrigeration.
Step 4 – Cool and Chill Your Key Lime Pie
Remove your pie from the oven and place it on a cooling rack.
Allow it to cool before transferring it to the refrigerator.
Refrigerate for at least 4 hours, although chilling it overnight can make preparation even easier when you’re serving it the following day.
This chilling period isn’t just about making the pie cold. It allows the filling to firm up so you can cut cleaner, more attractive slices.
Step 5 – Add the Whipped Cream
Pour cold heavy whipping cream into a mixing bowl.
Add powdered sugar and vanilla.
Beat until medium-to-stiff peaks form, being careful not to continue so long that the cream becomes grainy.
You can spread the whipped cream over the entire pie or pipe individual swirls around the edge.
Finish with fresh lime zest or thin lime slices.
How to Tell When Key Lime Pie Is Done
Knowing when to remove your pie from the oven is important because overbaking can affect its creamy consistency.
Look at the Center
Gently move the pie dish.
The edges should appear set, while the very center can still move slightly. You’re looking for a gentle jiggle rather than a visibly liquid center.
If the entire filling moves like liquid, give it additional baking time.
Avoid Overbaking Your Pie
Don’t wait until the filling looks hard.
Your Key Lime Pie continues setting as it cools, and refrigeration firms it even further.
Overbaking can take away some of the smooth, custard-like quality you’re trying to achieve.
Expert Tips for the Best Key Lime Pie
Small details can make a noticeable difference when you’re preparing this dessert.
- Zest before juicing. Whole limes are much easier to zest.
- Measure the juice. Don’t rely on the number of limes because their juice content varies.
- Pack your crust firmly. A loose crust is more likely to crumble when sliced.
- Don’t overmix. Once everything is smooth, your filling is ready.
- Give it enough chilling time. Four hours is good; overnight is even more convenient.
- Keep your whipping cream cold. Cold cream whips more easily.
- Use a clean knife. Wipe the blade between slices for cleaner presentation.
- Don’t skip the zest. It adds lime aroma without adding more liquid.
Common Key Lime Pie Mistakes to Avoid
Even an easy recipe can go wrong if you rush a few important steps.
A Crumbly Graham Cracker Crust
If your crust falls apart when you cut the pie, the crumbs may not have been packed tightly enough.
Make sure your crumbs are evenly coated in butter and press them firmly into the dish before baking.
Runny Key Lime Pie Filling
If your filling doesn’t hold its shape, several things could be responsible.
You may have removed it from the oven too early, measured an ingredient incorrectly, or sliced the pie before it had enough time to chill.
Give your finished pie several hours in the refrigerator before cutting it.
Overly Tart or Sweet Filling
Balance is important.
Adding significantly more lime juice than the recipe calls for can change both the flavor and consistency. Measure your ingredients rather than pouring by eye.
Cutting the Pie Too Soon
This is probably one of the hardest mistakes to avoid because the pie smells wonderful when it comes out of the oven.
Resist the temptation.
Cooling and chilling give the filling time to develop the texture you want.
Delicious Key Lime Pie Variations
Once you’ve mastered the basic recipe, you can change the presentation without losing the flavors you love.
Key Lime Pie With Extra Whipped Cream
If you prefer a softer citrus flavor, serve each slice with a generous spoonful of whipped cream.
The dairy helps balance the tart lime.
Mini Key Lime Pies
Prepare individual pies in small tart pans or lined muffin cups.
Mini versions are especially convenient for parties because your guests can grab individual portions without cutting a full pie.
Key Lime Pie Bars
Press the graham cracker mixture into a square baking pan instead of a pie dish.
Add your filling, bake, chill thoroughly, and cut it into squares.
You get essentially the same flavors in an easy-to-serve format.
Extra-Citrusy Key Lime Pie
Love strong citrus flavor?
Add a little additional fresh lime zest to the filling or sprinkle zest over the whipped cream before serving.
Zest adds plenty of citrus aroma without introducing much additional liquid.
What to Serve With Key Lime Pie
Key Lime Pie is rich enough to stand on its own, so simple accompaniments usually work best.
Try serving your slices with:
- Fresh strawberries
- Raspberries
- Blueberries
- Fresh whipped cream
- Iced tea
- Hot coffee
- Fresh fruit
For a summer gathering, berries and cold Key Lime Pie make an especially refreshing combination.
How to Store Key Lime Pie
Because your homemade Key Lime Pie contains eggs and dairy ingredients, treat it as a refrigerated dessert.
Refrigerating Key Lime Pie
After the pie has cooled, cover it and keep it refrigerated at 40°F or below.
USDA guidance says cooked egg dishes should be refrigerated promptly and generally used within 3–4 days. Its storage guidance also gives a 3–4-day refrigerator window for custard and chiffon pies.
For the best texture, keep your pie well covered so the filling doesn’t absorb refrigerator odors.
Don’t leave the pie sitting on the counter for extended periods. USDA guidance says refrigerated eggs shouldn’t remain at room temperature for more than two hours.
Can You Freeze Key Lime Pie?
You can prepare Key Lime Pie ahead, but freezing can change the texture of custard-style fillings and toppings.
If you decide to freeze your particular version, freeze it without the whipped cream when possible, wrap it securely, and thaw it slowly in the refrigerator. For the most predictable texture, refrigeration is preferable for short-term storage.
Make-Ahead Instructions
One of the best things about this easy Key Lime Pie recipe is that you don’t have to make it immediately before serving.
Making Key Lime Pie the Day Before
Prepare and bake your pie according to the recipe.
Allow it to cool, cover it, and refrigerate overnight.
The next day, whip your cream and decorate the pie shortly before serving.
Making it ahead gives the filling plenty of time to set and leaves you with less work when guests arrive.
Key Lime Pie Serving Information
Prep Time: 20 minutes
Cook Time: 25–28 minutes, including crust
Chilling Time: At least 4 hours
Total Time: About 4 hours 50 minutes
Servings: 8 slices
Difficulty: Easy to moderate
Nutrition will vary depending on the specific condensed milk, graham crackers, butter, cream, serving size, and other brands you use. If you publish nutritional information, calculate it from your exact ingredients rather than treating a generic estimate as precise.
FAQ About Key Lime Pie
Can You Make Key Lime Pie With Regular Limes?
Yes. If Key limes aren’t available, you can make the recipe with regular Persian limes. Your flavor will be somewhat different, but you’ll still get a refreshing sweet-and-tart lime dessert.
Does Key Lime Pie Need to Be Refrigerated?
Yes. A homemade Key Lime Pie containing eggs and dairy should be refrigerated after it has cooled. USDA guidance recommends refrigeration for egg-rich and cream-style pies.
Why Is My Key Lime Pie Runny?
Your pie may need additional baking or chilling time. Incorrect ingredient measurements can also affect consistency.
Let the pie cool completely and refrigerate it for at least four hours before deciding whether the filling is too soft.
Can You Make Key Lime Pie Ahead of Time?
Absolutely. In fact, making it the day before can be convenient because the pie already needs several hours to chill.
Prepare the pie, refrigerate it overnight, and decorate it with whipped cream before serving.
Can You Freeze Key Lime Pie?
Some versions can be frozen, although freezing and thawing may affect the creamy texture. If you choose to freeze yours, wrap it carefully and thaw it in the refrigerator.
What Is the Difference Between Key Lime Pie and Regular Lime Pie?
The biggest difference is the lime variety.
Traditional Key Lime Pie uses Key limes, while other lime pies may use standard Persian limes. The exact flavor and aroma will vary depending on the fruit you use.
How Long Should Key Lime Pie Chill Before Serving?
Give your pie at least 4 hours in the refrigerator.
If you’re planning ahead, chilling it overnight is an easy option and helps produce neat slices.
Should Key Lime Pie Be Green?
Don’t worry if your homemade pie isn’t bright green.
With egg yolks, condensed milk, and lime juice, the filling can naturally appear pale yellow or yellow-green. A strongly green commercial-looking filling generally requires added coloring.
Conclusion: Make This Key Lime Pie for Your Next Dessert
A homemade Key Lime Pie gives you almost everything you could want from a refreshing dessert: a crunchy graham cracker crust, creamy citrus filling, fluffy whipped topping, and that unmistakable sweet-tart finish.
Better yet, you don’t need complicated baking techniques to make it happen.
Take your time pressing the crust, measure your lime juice carefully, bake the filling until properly set, and don’t rush the chilling process. When you finally cut that first cold slice, you’ll have distinct layers and a creamy center that’s ready for your dessert table.
Make it for a summer cookout, Sunday dinner, birthday, holiday gathering, or simply because you’re craving something cool and citrusy.
Save this Key Lime Pie recipe so you can find it again, share it with someone who loves lime desserts, and leave a comment with your favorite way to serve Key Lime Pie.

Key Lime Pie






 Want an easier way to get my recipes? ❤️