
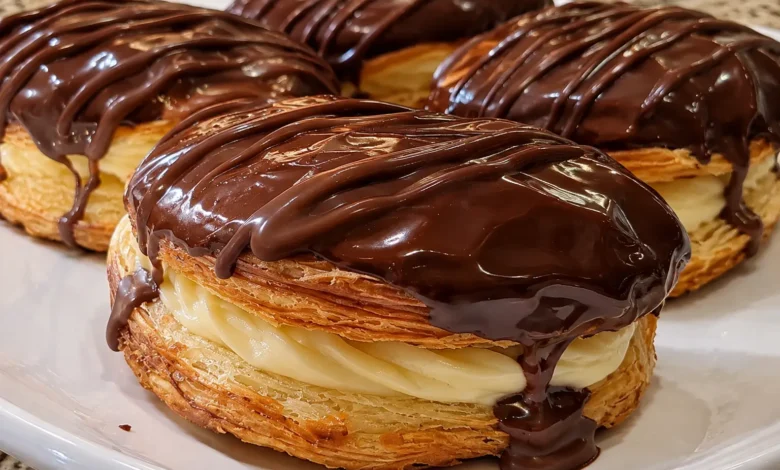
There’s something special about walking into a bakery and seeing rows of golden pastries topped with shiny chocolate. You know the ones—light, delicate shells filled with sweet vanilla cream and finished with a thick layer of chocolate. One bite, and you understand why they never stay in the display case for long.
What if you could make that same delicious treat in your own kitchen?
This Chocolate Glazed Cream-Filled Pastry recipe brings the bakery experience home with crisp, airy pastry shells, a smooth homemade vanilla custard filling, and a rich chocolate glaze. Each bite gives you the perfect combination of textures: a delicate outer shell, creamy center, and silky chocolate topping.
You don’t need expensive equipment or years of baking experience. With a little patience and a few everyday ingredients, you can create a dessert that looks beautiful enough for a celebration but feels comforting enough for an ordinary afternoon.
Whether you’re preparing something sweet for a holiday, surprising your family, or simply craving a homemade chocolate dessert, this recipe is worth trying.
What Is Chocolate Glazed Cream-Filled Pastry?
Chocolate Glazed Cream-Filled Pastry is a bakery-style dessert made with light choux pastry, a creamy filling, and a smooth chocolate topping.
This version is similar to a traditional French chocolate éclair. Instead of using ordinary pie dough or puff pastry, you prepare choux pastry, a special dough that rises in the oven through the power of steam.
As the pastry bakes, moisture inside the dough turns into steam, helping create a hollow center. That space is perfect for holding a generous amount of homemade vanilla pastry cream.
Once the shells have cooled, you fill them with custard and dip their tops into a glossy chocolate glaze.
The result is a dessert with three irresistible layers:
- Golden pastry shell: Light, delicate, and slightly crisp.
- Vanilla cream filling: Smooth, thick, and pleasantly sweet.
- Chocolate glaze: Rich, silky, and full of chocolate flavor.
Unlike many complicated bakery desserts, this homemade version uses ingredients you can find in most grocery stores.
Why You’ll Love This Chocolate Glazed Cream-Filled Pastry
There are plenty of reasons to add this dessert to your baking collection.
First, the combination of vanilla cream and chocolate is hard to resist. The filling provides a soft, creamy contrast to the pastry, while the chocolate adds just enough richness.
Second, these pastries look impressive on a serving platter. You can arrange them neatly for birthdays, Christmas gatherings, dinner parties, or weekend family celebrations.
You’ll also appreciate how flexible the recipe is. You can prepare the filling ahead of time, experiment with different chocolate varieties, or make smaller pastries for dessert trays.
Best of all, making them yourself means you get to enjoy the pastry at its freshest.
Ingredients for Chocolate Glazed Cream-Filled Pastry
You’ll prepare this recipe in three parts: the pastry shells, vanilla cream filling, and chocolate glaze.
Using fresh ingredients and measuring carefully will help you achieve the best texture.
Ingredients for the Pastry Shells
| Ingredient | Amount |
|---|---|
| Water | 1 cup |
| Unsalted butter | ½ cup |
| All-purpose flour | 1 cup |
| Large eggs | 4 |
| Granulated sugar | 1 teaspoon |
| Salt | ¼ teaspoon |
The butter adds richness, while the eggs help create a structured pastry that can rise and hold its shape.
Flour provides the foundation, and water produces the steam needed to form the hollow center.
Ingredients for the Vanilla Cream Filling
| Ingredient | Amount |
|---|---|
| Whole milk | 2 cups |
| Granulated sugar | ½ cup |
| Egg yolks | 4 |
| Cornstarch | ¼ cup |
| Unsalted butter | 2 tablespoons |
| Vanilla extract | 2 teaspoons |
| Salt | A pinch |
Whole milk gives your pastry cream a rich consistency without making it overly heavy.
Cornstarch and egg yolks thicken the mixture, creating a filling that holds its shape when piped into the pastry shells.
Ingredients for the Chocolate Glaze
| Ingredient | Amount |
|---|---|
| Semisweet chocolate, chopped | 6 ounces |
| Heavy whipping cream | ½ cup |
| Unsalted butter | 1 tablespoon |
Semisweet chocolate works especially well because its slightly bitter flavor balances the sweetness of the vanilla filling.
If you prefer a sweeter topping, you can substitute milk chocolate, although you may need to adjust the cream quantity for the right consistency.
Ingredient Substitutions
You can customize the recipe without changing its basic preparation.
- Use dark chocolate for a deeper cocoa flavor.
- Replace vanilla extract with vanilla bean paste.
- Add a little espresso powder to the chocolate glaze.
- Choose milk chocolate for a sweeter dessert.
For the most reliable results, keep the main choux pastry ingredients and their proportions unchanged.
Kitchen Equipment You’ll Need
Before you begin, gather your equipment so everything is ready when you need it.
You’ll need a medium saucepan, mixing bowls, a whisk, a wooden spoon, a baking sheet, parchment paper, a piping bag, and a wire cooling rack.
An electric mixer is helpful when incorporating eggs into the dough, but you can also mix by hand.
Can You Make These Pastries Without a Piping Bag?
Yes. If you don’t own a piping bag, use a sturdy zip-top plastic bag.
Fill the bag with dough, push the mixture toward one corner, and carefully cut a small opening.
You can use the same method for adding the vanilla cream filling.
The pastries may not look quite as uniform, but they’ll still taste delicious.
How to Make Chocolate Glazed Cream-Filled Pastry
Making homemade cream-filled pastries involves several steps, but each one is manageable.
The most important thing is to allow enough time for the pastry shells and cream filling to cool before assembly.
Step 1: Prepare the Choux Pastry Dough
Preheat your oven to 400°F (200°C) and line a large baking sheet with parchment paper.
In a medium saucepan, combine the water, butter, sugar, and salt.
Place the saucepan over medium heat and bring the mixture to a boil.
Once the butter has melted completely, add the flour all at once.
Stir vigorously with a wooden spoon until the mixture forms a smooth dough that pulls away from the sides of the saucepan.
Continue cooking for another 1–2 minutes while stirring. This helps remove excess moisture.
Remove the saucepan from the heat and allow the dough to cool for several minutes.
Add the eggs one at a time, mixing thoroughly after each addition.
The finished dough should be smooth, glossy, and thick enough to hold its shape when piped. Because egg sizes vary, check the consistency before adding all of the final egg.
Step 2: Shape and Bake the Pastry Shells
Transfer your dough into a piping bag fitted with a large round tip.
Pipe approximately 4-inch-long strips onto the prepared baking sheet, leaving space between each one.
Bake at 400°F for 15 minutes.
Without opening the oven, reduce the temperature to 350°F (175°C).
Continue baking for approximately 20–25 minutes, or until the shells are deeply golden, firm, and dry.
Avoid opening the oven during the early stages of baking. A sudden temperature drop can cause the pastry to collapse.
Once baked, make a small opening in each shell to release steam. Leave them in the switched-off oven with the door slightly open for a few minutes to help dry the interiors.
Transfer the shells to a wire rack and let them cool completely.
Step 3: Make the Homemade Vanilla Cream Filling
While the pastries cool, prepare the custard.
Pour the milk into a saucepan and warm it over medium heat until steaming.
In a separate bowl, whisk together the egg yolks, sugar, cornstarch, and salt until smooth.
Slowly pour a small amount of warm milk into the egg mixture while whisking constantly.
This process, called tempering, gradually warms the eggs and helps prevent scrambling.
Pour the tempered mixture back into the saucepan.
Cook over medium heat, whisking continuously, until the custard becomes thick and begins bubbling.
Continue whisking briefly to ensure the cornstarch cooks properly.
Remove from the heat and stir in the butter and vanilla extract.
Transfer the pastry cream to a shallow bowl and cover its surface directly with plastic wrap.
Refrigerate until thoroughly chilled.
Step 4: Prepare the Chocolate Glaze
Place the chopped semisweet chocolate into a heatproof bowl.
Heat the heavy cream in a small saucepan until hot and just beginning to steam. Do not let it boil vigorously.
Pour the warm cream over the chocolate and leave it undisturbed for approximately 2 minutes.
Stir gently until the chocolate melts and the mixture becomes smooth.
Add the butter and continue stirring until fully incorporated.
Allow the glaze to cool slightly so it thickens enough to coat the pastry without running off.
Step 5: Fill the Pastry Shells
Transfer the chilled vanilla cream into a piping bag.
Using a small knife or piping tip, make two or three small openings along the bottom of each pastry shell.
Insert the piping tip and gently squeeze the filling inside.
Continue until the pastry feels comfortably filled.
Avoid forcing in too much cream, as the delicate shells may split.
Step 6: Add the Chocolate Glaze
Hold each filled pastry upside down and dip its top into the chocolate glaze.
Lift it carefully and allow the excess chocolate to drip back into the bowl.
Place the pastry onto a parchment-lined tray.
Repeat with the remaining pastries.
Refrigerate briefly until the chocolate sets.
Your homemade Chocolate Glazed Cream-Filled Pastry is now ready to enjoy.
Expert Tips for Perfect Chocolate Glazed Cream-Filled Pastry
Even experienced bakers occasionally have trouble with choux pastry. Small adjustments can make a noticeable difference.
How to Make Light and Airy Pastry Shells
The secret to successful choux pastry begins with the dough’s moisture level.
When you cook the flour mixture in the saucepan, you’re removing some excess water and helping the starch develop.
This creates a dough capable of holding its shape.
Eggs should be added gradually because too much liquid can make the mixture runny.
Your dough should fall slowly from a spatula in a thick ribbon rather than pouring like cake batter.
Don’t Rush the Baking Process
Pastry shells need enough time in the oven to develop a strong exterior.
If you remove them too early, the remaining moisture may cause them to collapse as they cool.
Look for a deep golden color rather than a pale yellow finish.
How to Make Smooth Vanilla Pastry Cream
For a silky filling, whisk constantly while the custard cooks.
Keep the heat at medium or slightly lower if the mixture thickens too quickly.
If small lumps appear, you can press the warm custard through a fine-mesh strainer.
Always chill the cream completely before filling your pastries.
Warm filling can soften the shells and make assembly messy.
How to Get a Glossy Chocolate Glaze
Use finely chopped chocolate so it melts evenly.
Avoid overheating the cream or placing chocolate directly over high heat.
Stir slowly until the glaze becomes smooth.
If it seems too thick, add a small amount of warm cream. If it’s too thin, allow it to cool slightly before dipping.
Common Mistakes to Avoid
Knowing what can go wrong makes homemade pastry much easier to master.
| Problem | Likely Cause | Solution |
|---|---|---|
| Pastry collapses | Shells are underbaked | Bake until golden and dry |
| Dough spreads | Too much egg or moisture | Check dough consistency |
| Cream is runny | Custard wasn’t cooked enough | Cook until thick and bubbling |
| Glaze looks grainy | Chocolate overheated | Use gentle heat |
| Pastry becomes soggy | Filled too far in advance | Assemble closer to serving |
| Shells crack | Uneven shaping or expansion | Pipe evenly |
Why Is My Chocolate Glazed Cream-Filled Pastry Soggy?
The most common reason is moisture from the filling.
Once you add vanilla custard, the pastry gradually absorbs some of that moisture.
For the crispiest texture, fill the shells shortly before serving.
If you’re preparing dessert for a party, store the components separately until you’re ready to assemble them.
Delicious Variations to Try
Once you’ve mastered the classic recipe, you can experiment with different flavors.
Chocolate Cream-Filled Pastry
For an extra-chocolatey dessert, replace the vanilla pastry cream with chocolate custard.
You can prepare it by incorporating melted chocolate into the cooked filling.
The result is a rich dessert with chocolate inside and out.
Strawberry Cream-Filled Pastry
Add strawberry powder or a properly thickened strawberry puree to your vanilla cream.
The fruity filling pairs beautifully with the chocolate topping.
Coffee Chocolate Glazed Pastry
Mix a little instant espresso powder into the chocolate glaze.
Coffee enhances the chocolate flavor and gives the dessert a pleasant mocha taste.
White Chocolate Glazed Pastry
Replace semisweet chocolate with white chocolate for a sweeter variation.
White chocolate behaves differently when melted, so start with less cream and adjust until you reach a smooth dipping consistency.
Holiday Decorating Ideas
For Christmas, finish the pastries with red and green sprinkles.
For Easter, try pastel-colored decorations.
You can also add a thin white chocolate drizzle for birthdays, baby showers, or dessert tables.
How to Store Chocolate Glazed Cream-Filled Pastry
Because these pastries contain a dairy-and-egg-based filling, proper refrigeration is important.
Refrigerating Filled Pastries
Place your finished pastries in a single layer inside an airtight container.
Refrigerate at 40°F (4°C) or below.
For the best texture, enjoy them within 1–2 days. The shells will gradually soften as they absorb moisture from the filling.
Avoid leaving filled pastries at room temperature for more than two hours, or one hour in temperatures above 90°F (32°C).
Can You Freeze Cream-Filled Pastries?
Freezing the unfilled shells is usually the better option.
Once cooled, place the shells in a freezer-safe container or bag.
Freeze for up to 1–2 months for best quality.
When you’re ready to use them, thaw and refresh the empty shells briefly in a moderate oven, then cool before filling.
Freezing assembled pastries isn’t ideal because the custard may separate and the shells can become soft.
Make-Ahead Tips
If you’re preparing these pastries for a celebration, make the custard the day before.
You can also bake the shells ahead of time and store them separately.
Fill and glaze them on the day you plan to serve them for the freshest result.
Serving Ideas for Chocolate Glazed Cream-Filled Pastry
These pastries are beautiful enough to serve without additional decorations.
Arrange them on a white platter and let the glossy chocolate topping stand out.
For an afternoon treat, pair them with freshly brewed coffee, cappuccino, or hot tea.
If you’re serving a larger dessert spread, add fresh strawberries, raspberries, or other small pastries.
You can also make mini versions for parties. Smaller pastries are easier to serve and allow guests to enjoy several different desserts.
For a particularly elegant presentation, arrange them in neat rows and finish with a delicate drizzle of melted white chocolate.
Chocolate Glazed Cream-Filled Pastry Nutrition Information
The nutritional content depends on the size of your pastries, the quantity of filling, and the type of chocolate you use.
The recipe contains carbohydrates from flour and sugar, fats from butter and cream, and protein from eggs and milk.
For accurate nutrition information, calculate the values using your exact ingredient brands and divide the totals by the number of finished pastries.
If you prefer smaller portions, pipe shorter pastry shells and divide the filling evenly.
Frequently Asked Questions About Chocolate Glazed Cream-Filled Pastry
What Is Chocolate Glazed Cream-Filled Pastry Made Of?
It’s made from three main components: light choux pastry shells, creamy vanilla custard filling, and a rich chocolate glaze. Together, they create a classic bakery-style dessert similar to a chocolate éclair.
Can I Make Chocolate Glazed Cream-Filled Pastry Ahead of Time?
Yes. You can prepare the pastry shells and vanilla filling separately in advance. Store the cream in the refrigerator and assemble the pastries closer to serving time for the best texture.
How Do You Keep Chocolate Glazed Cream-Filled Pastry From Getting Soggy?
Make sure the shells are fully baked and cooled before filling. Keep the filling refrigerated and assemble the pastries as close to serving time as practical.
Can I Use Store-Bought Puff Pastry?
Yes, but the result will be different. Puff pastry creates flaky layers rather than the hollow interior of traditional choux pastry. You’ll need to bake and shape it differently before adding the filling.
How Long Does Chocolate Glazed Cream-Filled Pastry Last?
For the best quality, enjoy filled pastries within 1–2 days when stored in an airtight container in the refrigerator. Their texture gradually softens over time.
Why Is My Cream Filling Too Thin?
Thin filling usually happens when the custard hasn’t cooked long enough or the ingredients weren’t measured accurately. Cook until thickened and bubbling, then chill thoroughly before using.
What’s the Difference Between a Chocolate Éclair and Cream-Filled Pastry?
A chocolate éclair is a specific type of elongated choux pastry traditionally filled with cream and topped with chocolate. Cream-filled pastry is a broader term that can include éclairs and other filled baked desserts.
What Chocolate Is Best for Glazing Cream-Filled Pastries?
Semisweet chocolate is an excellent choice because it balances sweetness with a rich cocoa flavor. Dark chocolate works well if you prefer a less sweet finish, while milk chocolate creates a milder topping.
Conclusion: Make Your Own Chocolate Glazed Cream-Filled Pastry at Home
Few homemade desserts feel quite as rewarding as a tray of freshly prepared Chocolate Glazed Cream-Filled Pastries.
From the golden choux pastry to the smooth vanilla custard and glossy chocolate topping, every layer adds something special.
Although the recipe involves several steps, you don’t need professional baking skills to succeed. Careful measurements, proper baking, and enough cooling time will help you achieve beautiful results.
Whether you’re baking for a family gathering, preparing a holiday dessert, or treating yourself to something sweet, these pastries are a wonderful choice.
Once you taste the combination of delicate pastry, rich cream, and silky chocolate, you may find yourself making them again and again.
Now it’s your turn! Try this homemade Chocolate Glazed Cream-Filled Pastry recipe and see how delicious bakery-style desserts can be when you make them yourself.
Have you ever made cream-filled pastries at home? Share your experience in the comments, tell us which filling you’d love to try next, and save this recipe for your next baking day!

🍫 Chocolate Glazed Cream-Filled Pastry




 Want an easier way to get my recipes? ❤️