No-Bake Christmas Mini Cheesecakes (Perfect for Your Holiday Dessert Table)
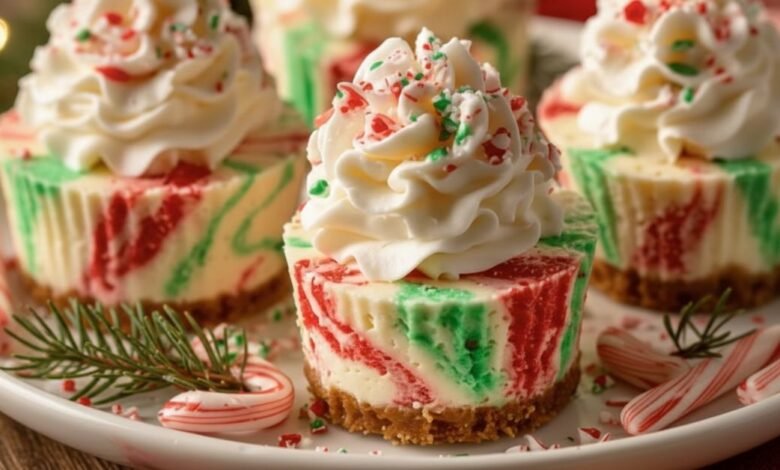
If you want a Christmas dessert that looks impressive, tastes amazing, and doesn’t hog your oven, these No-Bake Christmas Mini Cheesecakes are your new holiday hero. They’re creamy, festive, perfectly portioned, and simple enough to throw together even in the middle of December chaos.
You’ll start with a buttery graham cracker crust, pile on a light, fluffy cheesecake filling, and finish with red and green sprinkles (or crushed candy canes if you’re feeling extra Christmasy). No water baths, no cracked tops, no stress. Just mix, chill, and enjoy.
Why You’ll Love These No-Bake Mini Cheesecakes
- No baking required – Save your oven for the turkey, ham, or cookies.
- Perfectly portioned – Built-in portion control and ideal for parties or potlucks.
- Festive and customizable – Dress them up with sprinkles or crushed candy canes.
- Make-ahead friendly – They need chilling time anyway, so you can prep them in advance.
- Beginner-friendly – No complicated techniques; just mixing, whipping, and chilling.
Ingredients & Tools You’ll Need
You don’t need anything fancy to make these, just:
Basic tools:
- Mixing bowls
- Hand mixer or stand mixer
- Spatula
- Measuring cups and spoons
- Cupcake pan with cupcake liners or silicone molds
- Spoon or small measuring cup to press the crust
And here’s the full recipe exactly as you’ll make it:
No-Bake Christmas Mini Cheesecakes Recipe
Ingredients
- 1 ½ cups graham cracker crumbs
- 6 tbsp melted butter
- 2 tbsp granulated sugar
- 8 oz (225g) cream cheese, softened
- 1 cup powdered sugar
- 1 cup cold heavy cream
- 1 tsp vanilla extract
- Red and green sprinkles
- Optional: Crushed candy canes
Instructions
- Mix the graham cracker crumbs, melted butter, and sugar in a bowl until fully combined. (⏱️ 2 minutes)
- Press the crumb mixture firmly into cupcake liners or silicone molds to form the base. Chill to set. (⏱️ 10 minutes)
- Beat the softened cream cheese with powdered sugar until smooth and creamy. (⏱️ 3 minutes)
- Whip the cold heavy cream to stiff peaks, then gently fold it into the cream cheese mixture with vanilla. (⏱️ 4 minutes)
- Spoon or pipe the cheesecake filling over the prepared crusts, smoothing the tops. (⏱️ 3 minutes)
- Add festive sprinkles or crushed candy canes on top. (⏱️ 1 minute)
- Chill until completely set and firm. (⏱️ 1 hour)
Step-by-Step: Extra Tips for Perfect Results
Here’s a more detailed walk-through you can include in your blog post to help your readers succeed on the first try.
1. Making the Graham Cracker Crust
You’ll mix graham cracker crumbs, melted butter, and granulated sugar until the mixture resembles wet sand. The crumbs should be evenly coated in butter so they pack together nicely.
- If the mixture feels too dry and doesn’t hold when squeezed, you can mention that readers may add a tiny bit more melted butter (a teaspoon at a time), but the base recipe is usually just right.
- To press the crust evenly, use the back of a spoon or the bottom of a small measuring cup. Firm, even pressure helps the crust hold together when you unwrap the cheesecakes.
Chill the crusts so they can firm up before adding the filling—this prevents crumbs from mixing into the cheesecake layer.
2. Making the Cheesecake Filling
First, you’ll beat softened cream cheese with powdered sugar until it’s completely smooth and creamy.
- Make sure the cream cheese is truly softened (room temperature) so there are no lumps.
- Scrape down the sides of the bowl once or twice while mixing.
In a separate bowl, you’ll whip cold heavy cream to stiff peaks.
- “Stiff peaks” means that when you lift the beaters out of the cream, the peaks stand up straight without collapsing.
- The cream needs to be cold for it to whip properly, so keep it in the fridge until the moment you use it.
Gently fold the whipped cream into the cream cheese mixture along with the vanilla extract.
- Use a spatula and a light folding motion so you don’t knock too much air out of the whipped cream.
- The result should be a light, airy, mousse-like cheesecake filling.
3. Assembling the Mini Cheesecakes
Once your crusts are chilled and firm:
- Spoon or pipe the cheesecake filling on top of each crust.
- Piping will give you a more bakery-style, swirled look, while spooning and smoothing is quick and simple.
Smooth the tops with the back of a spoon or a small offset spatula if you want a clean, flat surface for decorating.
4. Decorating for Christmas
This is where the Christmas magic happens:
- Red and green sprinkles add instant holiday vibes with almost no effort.
- Crushed candy canes give a pop of peppermint flavor and a pretty, snowy look on top.
You can decorate:
- Right away, before chilling, so the decorations slightly settle into the filling.
- Or after chilling, for a more defined look on top.
Chilling Time: Don’t Skip This Step
The cheesecakes need at least 1 hour in the fridge to firm up and fully set. Longer is even better—2–4 hours or overnight will give you the best texture.
This also makes them an ideal make-ahead dessert when you know you’ll be busy on the day of your party or family gathering.
Variations You Can Mention (Without Changing the Base Recipe)
To keep your original recipe intact, you can suggest these as optional variations in your blog post:
- Peppermint Twist:
Stir in a small handful of finely crushed candy canes into the cheesecake filling for a light peppermint flavor. - Chocolate Drizzle:
Drizzle melted chocolate or chocolate ganache over the chilled cheesecakes before serving. - Gingerbread Crust:
Swap some or all of the graham cracker crumbs with crushed gingerbread cookies for a spiced holiday base. - Flavor Extracts:
Add a hint of almond extract or peppermint extract in addition to the vanilla for a subtle twist (just a few drops—these flavors are strong).
Be clear these are ideas, not changes to the core recipe, so readers know the base version is exactly as written.
Make-Ahead, Storage & Freezing
Give your readers some practical storage tips:
- Fridge:
Store the mini cheesecakes in an airtight container in the refrigerator. They’ll stay fresh for about 3–4 days. - Freezer:
You can freeze them (preferably undecorated) on a tray until firm, then transfer to an airtight container. Thaw in the fridge before serving, and add sprinkles or candy canes just before putting them out. - Serving Temperature:
Serve chilled for the best texture. Leaving them out for 10–15 minutes before serving is fine, but they shouldn’t sit in a warm room for hours.
How to Serve These at a Christmas Gathering
Here are some ideas you can write about to help your readers visualize:
- Arrange the mini cheesecakes on a tiered dessert stand with other Christmas treats.
- Mix toppings—some with sprinkles, some with crushed candy canes—so the platter looks varied and festive.
- Add a little sign or tag that says “No-Bake Christmas Mini Cheesecakes” for a party-perfect touch.
- Pair with hot chocolate, coffee, or mulled wine on a cozy dessert table.
FAQs You Can Add to Your Blog Post
Can I use a different crust?
Yes, readers can use crushed digestive biscuits, vanilla wafers, or gingerbread cookies instead of graham crackers, as long as they keep the butter and sugar ratio similar for the same texture.
Can I make these in a mini muffin pan?
Absolutely. The recipe stays the same—you’ll just get more, smaller cheesecakes. Let readers know they may need slightly less crust and filling per cup and to keep an eye on how much they’re adding.
Why is my filling runny?
Likely causes: the heavy cream wasn’t whipped to stiff peaks, or the cheesecakes didn’t chill long enough. Remind readers that chilling is essential for setting.
Wrap-Up: A Simple Showstopper for Christmas
These No-Bake Christmas Mini Cheesecakes are the kind of dessert that looks like you fussed for hours, but really comes together in just a few simple steps. With a buttery graham cracker base, a creamy, sweet cheesecake filling, and festive toppings, they’re perfect for holiday parties, family dinners, or cozy nights in with a Christmas movie.