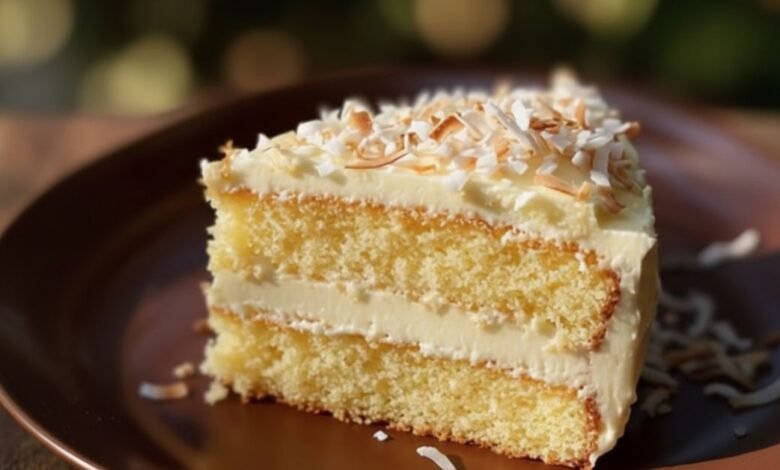
Classic Coconut Layer Cake
There’s something timeless about a coconut cake.
It doesn’t need bright colors or fancy decorations. Instead, it wins you over with its soft, buttery crumb, gentle coconut flavor, and a frosting that tastes like a hug. This Classic Coconut Layer Cake is exactly that kind of dessert: the kind of cake that feels at home at birthdays, holidays, Easter, baby showers, or just a Sunday afternoon when you want something special.
If you’ve ever wanted a bakery-style coconut cake but weren’t sure where to start, this recipe walks you through it step by step. You’ll bake three tender 8‑inch layers, stack them with a rich coconut frosting, and finish with a generous blanket of sweetened shredded coconut. It looks impressive, but the process is very doable—even if you’re not a pro baker.
Why You’ll Love This Coconut Layer Cake
Here’s what makes this recipe such a keeper:
- Soft, fluffy crumb: The butter, sugar, and eggs are creamed together to trap air, giving the cake structure and lightness.
- Balanced coconut flavor: Coconut milk (or whole milk) keeps the cake moist, while coconut extract (optional) adds a gentle boost of flavor without being overpowering.
- Three beautiful layers: Three 8-inch layers bake evenly and stack into a tall, elegant cake that looks stunning on a cake stand.
- Simple, reliable frosting: A classic butter-and-powdered-sugar frosting enriched with coconut milk and vanilla—no complicated techniques, no tricky cooked syrups.
- A coconut “snow” finish: Pressing shredded coconut onto the frosting gives you that iconic coconut cake look with minimal decorating skills required.
Ingredient Overview (What Each One Does)
You’ll find the exact ingredient list and instructions in the recipe card below, but here’s a quick walkthrough of what’s going on in this cake.
For the Cake
- All-purpose flour: The structure of your cake. Measuring it correctly (spoon and level) helps keep the crumb soft instead of dense.
- Baking powder: The main leavening agent. It gives the cake lift and helps it rise evenly.
- Salt: Just a little, to balance the sweetness and bring out flavor.
- Unsalted butter: For richness, flavor, and tenderness. Room temperature butter creams beautifully with sugar to create that light, airy base.
- Granulated sugar: Sweetens the cake and helps create a light structure when beaten with butter.
- Eggs: Bind the batter, add richness, and help with structure. Room temperature eggs combine more easily and help the batter emulsify.
- Vanilla extract: The background flavor that ties everything together.
- Coconut extract (optional): Adds extra coconut flavor, great if you really want that coconut note to shine.
- Coconut milk or whole milk: Provides moisture and richness. Coconut milk adds more coconut flavor; whole milk gives a classic, neutral richness.
For the Frosting
- Unsalted butter: The base of your frosting—creamy and rich.
- Powdered sugar: Sweetens and thickens, giving the frosting its classic fluffy texture.
- Coconut milk: Loosens the frosting to a spreadable consistency and adds a hint of coconut flavor.
- Vanilla extract: Adds warmth and depth to the frosting.
- Sweetened shredded coconut: Pressed on the outside for texture, flavor, and that signature coconut cake look.
Step-by-Step: Bringing Your Coconut Cake to Life
Let’s walk through the steps in the recipe with extra tips so your cake turns out beautifully every time.
1. Prep your pans and oven
From the recipe:
Preheat oven to 350°F (175°C). Grease and flour three 8-inch round cake pans.
Proper prep is the foundation of a good layer cake. Grease and flour the pans well so your layers release cleanly. You can also line the bottoms with parchment circles for extra insurance.
2. Combine dry ingredients
In a bowl, whisk together flour, baking powder, and salt.
Whisking does two things: evenly distributes the baking powder and salt and lightly aerates the flour. This means the leavening works evenly throughout the batter.
3. Cream butter and sugar
In a large bowl, cream butter and sugar until light and fluffy. Add eggs one at a time, beating well after each. Mix in vanilla and coconut extract.
This step builds the structure and lightness of your cake:
- “Light and fluffy” usually means the mixture is paler and increased in volume.
- Adding eggs one at a time helps them incorporate smoothly and keeps the batter from curdling.
- The extracts go in at the end so their flavor is nicely distributed.
4. Alternate dry ingredients and milk
Add flour mixture alternately with coconut milk, beginning and ending with flour. Mix until just combined.
Alternating the dry ingredients with the milk helps keep the batter smooth and prevents overmixing:
- Start with about ⅓ of the flour mixture, mix gently.
- Add about ½ the milk, mix gently.
- Repeat, ending with the dry ingredients.
Once the last bit of flour disappears, stop mixing. Overmixing at this stage can make your cake tough.
5. Bake the layers
Divide batter evenly between prepared pans. Bake for 25–30 minutes or until a toothpick comes out clean. Let cakes cool in pans for 10 minutes, then turn out onto wire racks to cool completely.
A few helpful hints:
- Try to divide the batter as evenly as possible so all three layers bake at the same rate. You can use a kitchen scale if you want to be precise.
- The cakes are done when a toothpick comes out clean or with just a few moist crumbs—no wet batter.
- Cooling in the pan for 10 minutes helps the structure set so the layers don’t break when you turn them out.
- Always let them cool completely before frosting, or the frosting will melt and slide.
6. Make the frosting
For frosting, beat butter until creamy. Gradually add powdered sugar, then coconut milk and vanilla. Beat until fluffy.
The frosting should be smooth and spreadable:
- Start by beating the butter on its own until it’s creamy and slightly lighter.
- Add the powdered sugar slowly to avoid a sugar cloud, and to ensure it incorporates evenly.
- Add coconut milk a little at a time until it reaches your ideal consistency—thick enough to hold its shape, but soft enough to spread.
- A final beat on medium-high helps make the frosting extra fluffy.
7. Assemble and coat with coconut
Spread frosting between cake layers and over the top and sides. Gently press shredded coconut onto the frosting to coat the cake.
Assembly tips:
- Place a small dab of frosting on your cake board or plate before setting down the first layer—this keeps the cake from sliding.
- Spread an even layer of frosting between each cake layer.
- Apply a thin “crumb coat” layer of frosting around the sides, chill briefly if you like, then finish with a thicker final coat.
- Press the shredded coconut into the frosting with your hands. Work over a sheet of parchment or a tray to catch any coconut that falls.
8. Chill before slicing
Chill for 30 minutes before slicing for neat layers. Enjoy!
That short chill time is key for clean slices. It lets the frosting firm up and helps the layers stay put when you cut.
Make-Ahead, Storage & Freezing
Your readers will appreciate knowing how to plan ahead, so you can include guidance like this:
- Make ahead (cake layers):
Bake the layers, let them cool completely, then wrap each layer tightly in plastic wrap. You can keep them at room temperature for up to 1 day or freeze for up to 2 months. Thaw wrapped at room temperature before frosting. - Make ahead (frosting):
The frosting can be made 1–2 days in advance. Store it in an airtight container in the fridge. When you’re ready to use it, let it come to room temperature and beat it again to restore its fluffiness. - Assembled cake:
Once frosted and covered in coconut, the cake can be stored in the fridge, covered, for about 3–4 days. Bring it out 30–45 minutes before serving so the butter in the frosting can soften and the texture is at its best. - Freezing slices:
You can freeze individual slices wrapped tightly and stored in a freezer bag. Thaw in the fridge or at room temperature for a sweet treat anytime.
Variations & Customization Ideas
The base recipe stays exactly the same, but you can offer your readers some optional twists:
- Extra coconut punch: Use coconut milk (rather than whole milk) and keep the coconut extract in the batter.
- Toasted coconut finish: Toast some or all of the shredded coconut before pressing it onto the cake for a deeper, nutty flavor.
- Citrus twist: Add a bit of finely grated lime or lemon zest to the batter or frosting for a bright, tropical note.
- Layer surprise: Spread a thin layer of lemon curd, raspberry jam, or pastry cream between the layers along with the frosting.
All of these are optional add-ons that build on your existing recipe without changing it.
Troubleshooting Tips
If your readers are newer to baking, a few notes like these can save them:
- Cake turned out dense?
Likely causes: overmixing the batter, not creaming the butter and sugar long enough, or adding too much flour (packed cups instead of spoon-and-level). - Cake stuck to the pan?
Make sure the pans are well greased and floured. Parchment circles on the bottom are a big help. - Frosting too thick?
Add a tiny splash more coconut milk (just a teaspoon at a time) until it’s spreadable. - Frosting too thin?
Add a bit more powdered sugar and beat until it thickens up.
FAQ for Your Blog
You can drop a short FAQ section at the bottom for SEO and reader help:
Can I make this coconut cake in two layers instead of three?
Yes. You can divide the batter between two 9-inch pans instead of three 8-inch pans; just adjust the baking time and keep an eye on doneness.
Do I have to use coconut extract?
No. It’s optional. The cake will still be delicious with just vanilla and coconut milk (if using). The extract simply boosts the coconut flavor.
What kind of coconut milk should I use?
Canned coconut milk or carton coconut milk will both work. Full-fat canned coconut milk will give a richer texture. Shake or stir it well before measuring.
Can I use unsweetened shredded coconut on the outside?
You can, but the flavor and texture will be a bit different—less sweet and slightly drier. Sweetened shredded coconut gives that classic bakery-style taste.
The Recipe: Classic Coconut Layer Cake
Here is your recipe, kept exactly as you wrote it:
Classic Coconut Layer Cake
Ingredients:
For the Cake:
2½ cups all-purpose flour
2½ tsp baking powder
½ tsp salt
1 cup unsalted butter, room temperature
2 cups granulated sugar
4 large eggs, room temperature
1 tsp vanilla extract
1 tsp coconut extract (optional)
1 cup coconut milk or whole milk
For the Frosting:
1 cup unsalted butter, room temperature
4 cups powdered sugar
¼ cup coconut milk
1 tsp vanilla extract
2 cups sweetened shredded coconut (for covering)
Instructions:
- Preheat oven to 350°F (175°C). Grease and flour three 8-inch round cake pans.
- In a bowl, whisk together flour, baking powder, and salt.
- In a large bowl, cream butter and sugar until light and fluffy. Add eggs one at a time, beating well after each. Mix in vanilla and coconut extract.
- Add flour mixture alternately with coconut milk, beginning and ending with flour. Mix until just combined.
- Divide batter evenly between prepared pans. Bake for 25–30 minutes or until a toothpick comes out clean. Let cakes cool in pans for 10 minutes, then turn out onto wire racks to cool completely.
- For frosting, beat butter until creamy. Gradually add powdered sugar, then coconut milk and vanilla. Beat until fluffy.
- Spread frosting between cake layers and over the top and sides. Gently press shredded coconut onto the frosting to coat the cake.
- Chill for 30 minutes before slicing for neat layers. Enjoy!